-
Use Cases
Industrien
Getting started
-
Insights & Wissen
Für User
Support
This lesson assumes that you want to set up an OPC Unified Architecture (a.k.a OPC UA) server as an integrated Connectware resource which other clients can connect to. To understand the basic concepts of the Connectware, please take a look at the Technical Overview lesson.
To follow along with the example, you will need a running instance of the Connectware 1.0.18 or later. In case you do not have that, learn How to install the Connectware.
In this article we will create a Connectware service which configures and enables the OPC UA server. If you are new to services and creating commissioning files, read our article about Service Basics. If you would like to set up the Connectware as an OPC UA client, please view the article How to Connect to an OPC UA Server.
This article will teach you how to use the Connectware OPC UA server resource in your system setup. In more detail, the following topics are covered:
You can download the service commissioning file that we use in this example from the Cybus GitHub repository.
We will use Prosys OPC UA Client for testing in this guide. However, it is up to you to decide which tool to work with. You can use FreeOpcUa’s Simple OPC UA GUI client, which is open source and available for all major OS’s. If you feel more comfortable working on the terminal, go for Etienne Rossignon’s opcua-commander. In case you prefer online tools, try One-Way Automation’s OPC UA Web Client. It is free to use, but you will be asked to sign up first and you will not be able to connect to servers on your local network.
Since the release of version 1.0.18, Connectware supports a new type of resource that can be utilized in services: The server resource enables services to run servers within Connectware and the first protocol supported by this resource is OPC UA. Thus, you can set up an OPC UA server, which can be used to receive data from or provide data to devices or applications mainly in industrial environments. Being fully integrated into Connectware, this feature allows to reduce the overheads in selecting, deploying, maintaining and integrating a separate software for fulfilling this demand in your system.
The OPC UA server is internally connected to the Connectwares protocol mapper, which means that you can map your data from any other protocol supported by the Connectware directly on data nodes of the OPC UA server. In the service commissioning file, OPC UA server nodes can be handled just as any other endpoint. Therefore, you can use them in mappings as usual by simply defining the data source and target.
The Commissioning File contains all resource definitions and is read by Connectware. To understand the file’s anatomy in detail, please consult our Reference docs.
Start by opening a text editor and creating a new file, e.g. opcua-server-example-commissioning-file.yml. The commissioning file is in the YAML format, perfectly readable for both humans and machines! We will now go through the process of defining the required sections for this example.
These sections contain more general information about the commissioning file. You can give a short description and add a stack of metadata. As for metadata, only the name is required, while the rest is optional. We will use the following set of information for this lesson:
description: >

 OPC UA Server Example Commissioning File
 Cybus Learn - How to set up the integrated Connectware OPC UA server
 https://www.cybus.io/learn/how-to-set-up-the-integrated-connectware-opc-ua-server/

metadata:

 name: OPC UA Server Example Commissioning File
 version: 1.0.0
 icon: https://www.cybus.io/wp-content/uploads/2019/03/Cybus-logo-Claim-lang.svg
 provider: cybus
 homepage: https://www.cybus.io
Code-Sprache: YAML (yaml)In the resources section we declare every resource that is needed for our application. The first necessary resource is the OPC UA server.
resources:
 opcuaServer:
   type: Cybus::Server::Opcua
   properties:
     port: 4841
     resourcePath: /UA/CybusOpcuaServer
     alternateHostname: localhost
     applicationUri: 'urn:cybus:opcua:server:1'
     allowAnonymous: true
     securityPolicies: ["None", "Basic256Sha256"]
     securityModes: ["None", "SignAndEncrypt"]
Code-Sprache: YAML (yaml)
We create the OPC UA server by defining the type of the resource, namely Cybus::Server::Opcua. Then we define its properties: we set the port to 4841 to not get in conflict with other possibly present OPC UA servers. You can also set values for resourcePath and applicationUri, however in this case we proceed with the default ones. We have to set the alternateHostname to the own IP address of the Connectware host and we set allowAnonymous to true, so we can access the server without creating a user for this example. Note that this is not recommended for productive environments. With securityPolicies and securityModes we can define the options that should be supported by the server as an array.
The next resources needed are the OPC UA server nodes. Let’s extend our list with some resources of the type Cybus::Node::Opcua.
1_root:
   type: Cybus::Node::Opcua
   properties:
     nodeType: Object
     parent: !ref opcuaServer
     nodeId: ns=1;s=1_root
     browseName: "root"

 1.1_DataNodes:
   type: Cybus::Node::Opcua
   properties:
     nodeType: Object
     parent: !ref 1_root
     nodeId: ns=1;s=1.1_DataNodes
     browseName: "DataNodes"
Code-Sprache: YAML (yaml)
The node resources of the OPC UA server build up a hierarchy of objects and variables. We create two levels of parent nodes here, which are of the nodeType Object. The first level is the root node. This has the server itself as a parent and we reference the server resource by using !ref opcuaServer. The second level then has the root as a parent, also defined by referencing. In this way, you can build up a hierarchy in which you can then create your variable nodes.
1.1.1_Boolean:
   type: Cybus::Node::Opcua
   properties:
     nodeType: Variable
     parent: !ref 1.1_DataNodes
     operation: serverProvides
     nodeId: ns=1;s=1.1.1_Boolean
     browseName: Boolean
     dataType: Boolean
     initialValue: false

 1.1.2_Int32:
   type: Cybus::Node::Opcua
   properties:
     nodeType: Variable
     parent: !ref 1.1_DataNodes
     operation: serverReceives
     nodeId: ns=1;s=1.1.2_Int32
     browseName: Int32
     dataType: Int32
     initialValue: 0

 1.1.3_String:
   type: Cybus::Node::Opcua
   properties:
     nodeType: Variable
     parent: !ref 1.1_DataNodes
     operation: serverProvidesAndReceives
     nodeId: ns=1;s=1.1.3_String
     browseName: String
     dataType: String
     initialValue: "intial"
Code-Sprache: YAML (yaml)
The variable nodes are of the type Cybus::Node::Opcua as well, but their nodeType is Variable. As a parent for our variables, we choose !ref 1.1_dataNodes. The operation which these nodes should serve can be of three types: serverProvides, serverReceives and serverProvidesAndReceives. serverProvides is a node which provides data and can be read by the OPC UA client. serverReceives is a node that receives data from an OPC UA client, while serverProvidesAndReceives nodes can be used in both ways. Furthermore, we choose a dataType for every variable and an initialValue which is the value present on the node after the server has started.
For all nodes in this section we defined a nodeId and a browseName, which can be used to address the nodes. The node ID must be unique on the server. The browse name can be used multiple times, but any browse path derived from it must be unique. However, explaining the OPC UA address space is certainly out of scope for this lesson. If you would like to learn more about the concepts of the OPC UA address space, then the Address Space Concepts documentation by Unified Automation will be a good place to start.
At this point we would already be able to read and write values to the OPC UA server utilizing OPC UA clients. However, to transfer data from devices or applications using other protocols to the OPC UA server, we have to create a mapping. This will allow us to forward data from any other protocol to be provided through the OPC UA server, or conversely, forward data received through the OPC UA server to any other protocol.
MqttMapping:
   type: Cybus::Mapping
   properties:
     mappings:
       - subscribe:
           topic: "opcua/provides/boolean"
         publish:
           endpoint: !ref 1.1.1_Boolean
       - subscribe:
           endpoint: !ref 1.1.2_Int32
         publish:
           topic: "opcua/receives/int32"
       - subscribe:
           endpoint: !ref 1.1.3_String
         publish:
           topic: "opcua/receives/string"
       - subscribe:
           topic: "opcua/provides/string"
         publish:
           endpoint: !ref 1.1.3_String
Code-Sprache: YAML (yaml)
In this case we want to provide the boolean values published on the MQTT topic opcua/provides/boolean, which will be provided on the OPC UA server node 1.1.1_Boolean. We will achieve this by referencing the node using !ref. Furthermore, we want the values received by the OPC UA node 1.1.2_Int32 to be published on MQTT topic opcua/receives/int32. To be able to use 1.1.3_String in both directions, we need to create two mappings: one to publish received values on opcua/receives/string and one to provide values published on opcua/provides/string to the OPC UA clients.
Instead of publishing or subscribing to MQTT topics, we could also reference endpoints on connections of other protocols in the same way as we do it for the OPC UA server nodes.
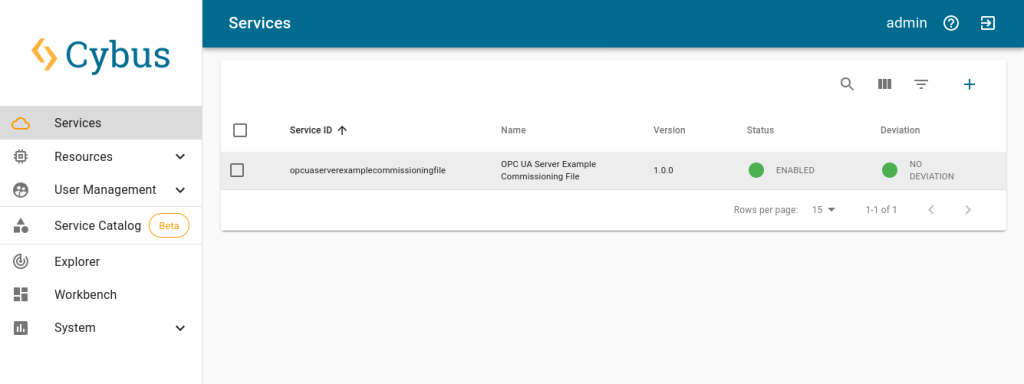
You now have the commissioning file ready for installation. Go to the Services tab in the Connectware Admin UI and click the (+) button to select and upload the commissioning file. After confirming this dialog, the service will be installed. On enabling the service, all the resources we just defined will be created: The OPC UA server, the server nodes and the mapping. Once the service has been successfully enabled, you can go ahead and see if everything works.
Now that our OPC UA server is running, we can go to the Explorer tab, where the tree structure of our newly created endpoints can be seen and the endpoints can be inspected. Hover over an entry and select the eye icon on the right – this activates the live view.
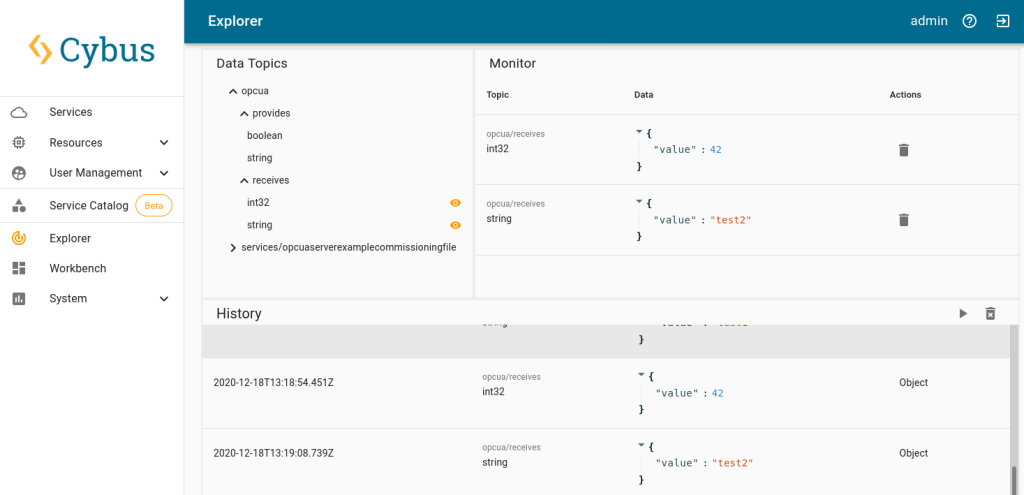
We can now use the OPC UA client to connect to our server on port 4841. Since we configured it to accept anonymous clients, we can just go ahead. If we wanted to allow access only to registered users, we would create them in the Connectware user management. But for now, after connecting to our OPC UA server anonymously, we can send data to the receiving variable nodes. In the Explorer view we can then see this data being published on the MQTT topics, on which we mapped the OPC UA variable nodes.
Additionally utilizing an MQTT client, we could now subscribe to this data or also publish data on the topic which is mapped on the providing variable nodes to send it to OPC UA clients. An easy way to experiment with these possibilities is the Workbench. There you can also easily configure MQTT nodes for quick prototyping. See our other articles to learn more about the Workbench.
Setting up an OPC UA server with a service commissioning file is quite simple. To adjust the server to suit your needs, the configuration with the commissioning file offers various additional options which are described in the Connectware Docs. Being integrated into Connectware, this OPC UA server can also be directly connected to the protocol mapper and through it to systems using other protocols.
Connectware offers powerful features to build and deploy applications for gathering, filtering, forwarding, monitoring, displaying, buffering, and all kinds of processing data… why not build a dashboard, for instance? For guidance, read more on Cybus Learn.
MQTT as an open network protocol and OPC UA as an industry standard for data exchange are the two most common players in the IIoT sphere. Often, MQTT (Message Queuing Telemetry Transport) is used to connect various applications and systems, while OPC UA (Open Platform Communications Unified Architecture) is used to connect machines. Additionally, there are also applications and systems that support OPC UA, just as there are machines or devices that support MQTT. Therefore, when it comes to providing communication between multiple machines/devices and applications that support different protocols, a couple of questions might arise. First, how to bridge the gap between the two protocols, and second, how to do it in an efficient, sustainable, secure and extensible way.
This article discusses the main aspects of MQTT and OPC UA and illustrates how these protocols can be combined for IIoT solutions. The information presented here would thus be useful for IIoT architects.
Both protocols are the most supported and most utilized in the IIoT. MQTT originated in the IT sphere and is supported by major IoT cloud providers, such as Azure, AWS, Google, but also by players specialized in industrial use cases, e.g. Adamos, Mindsphere, Bosch IoT, to name a few. The idea behind MQTT was to invent a very simple yet highly reliable protocol that can be used in various scenarios (for more information on MQTT, see MQTT Basics). OPC UA, on the contrary, was created by an industry consortium to boost interoperability between machines of different manufacturers. As MQTT, this protocol covers core aspects of security (authentication, authorization and encryption of the data) and, besides, meets all essential industrial security standards.
IIoT use cases are complex, because they bring together two distinct environments – Information Technology (IT) and Operational Technology (OT). Traditionally, the IT and OT worlds were separated from each other, had different needs and thus developed very different practices. One of such dissimilarities is the dependence on different communication protocols. The IT world is primarily influenced by higher level applications, web technology and server infrastructure, so the adoption of MQTT as an alternative to HTTP is on the rise there. At the same time, in the OT world, OPC UA is the preferable choice due to its ability of providing a perfectly described interface to industrial equipment.
Today, however, the IT and OT worlds gradually converge as the machine data generated on the shopfloor (OT) is needed for IIoT use cases such as predictive maintenance or optimization services that run in specialized IT applications and often in the cloud. Companies can therefore benefit from combining elements from both fields. For example, speaking of communication protocols, they can use MQTT and OPC UA along with each other. A company can choose what suits well for its use case’s endpoint and then bridge the protocols accordingly. If used properly, the combination of both protocols ensures greatest performance and flexibility.
As already mentioned above, applications usually rely on MQTT and machines on OPC UA. However, it is not always that straightforward. Equipment may also speak MQTT and MES systems may support OPC UA. Some equipment and systems may even support both protocols. On top of that, there are also numerous other protocols apart from MQTT and OPC UA. All this adds more dimensions to the challenge of using data in the factory.
This IIoT challenge can, however, be solved with the help of middleware. The middleware closes the gap between the IT and OT levels, it enables and optimises their interaction. The Cybus Connectware is such a middleware.
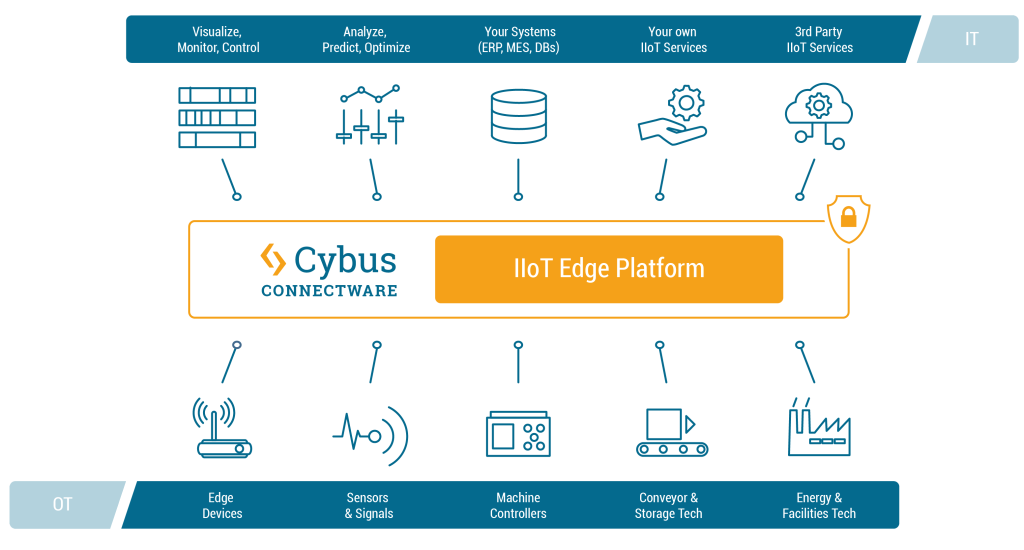
The Cybus Connectware supports a broad variety of protocols – including MQTT and OPC UA – and thus makes it possible to connect nearly any sort of IT application with nearly any sort of OT equipment. In the case of OPC UA and MQTT, the bridging of two protocols is achieved through connecting four parties: OPC UA Client, OPC UA Server, MQTT Client and MQTT Broker. The graphic below illustrates how the Cybus Connectware incorporates these four parties.
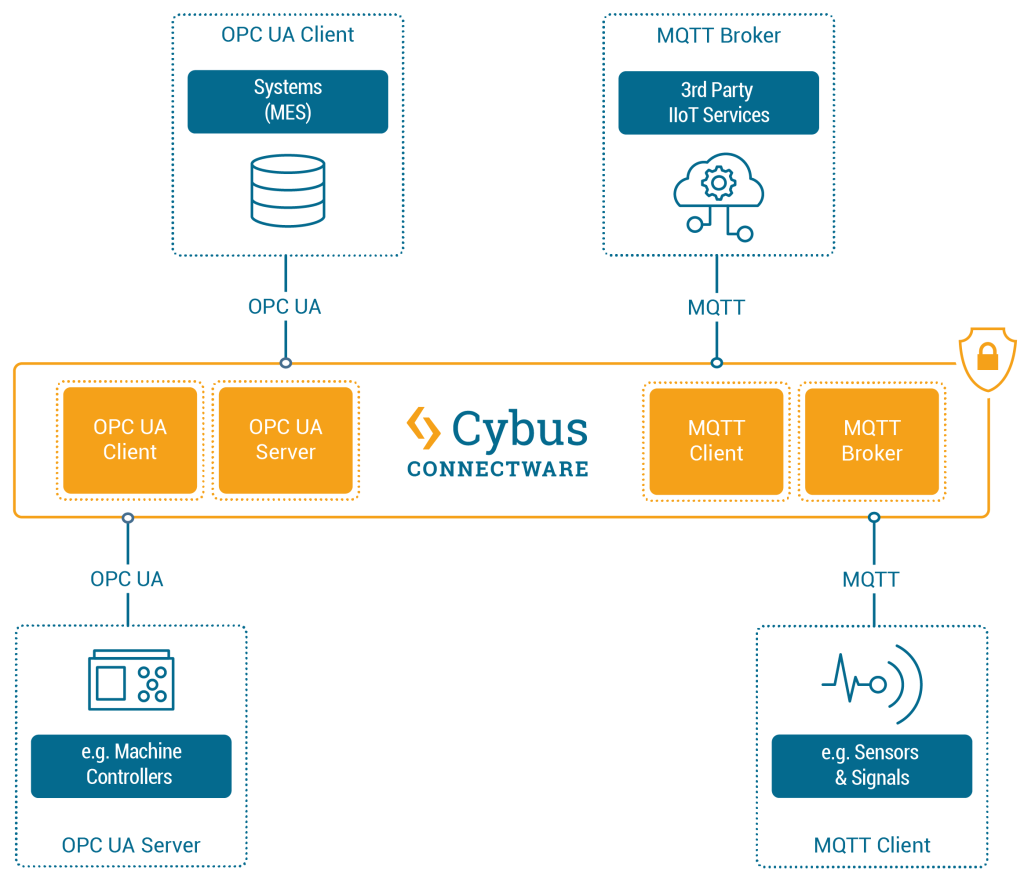
On the machines layer, different equipment can be connected to Connectware. For example, if a device such as a CNC controller (e.g. Siemens SINUMERIK) that uses OPC UA should be connected, then Connectware will serve as the OPC UA Client and the controller as the OPC UA Server. While connecting a device that supports MQTT (e.g. a retrofit sensor), Connectware will act as the MQTT broker, and the sensor will be the MQTT client.
Likewise, various applications can be connected to Connectware on the applications layer. In case of connecting services that support MQTT (e.g. Azure IoT Hub or AWS IoT / Greengrass), Connectware will act as the MQTT client, while those services will act as MQTT brokers. If connecting systems that support OPC UA (e.g. MES), Connectware will play the role of the OPC UA Server, while the systems will act as OPC UA clients.
The question may arise as to why not connect applications or systems that support a specific protocol directly to devices that support the same protocol, e.g. a SINUMERIK machine controller to a MES (which both “speak” OPC UA), or a retrofit sensor to the Azure IoT Hub (which both can communicate via MQTT)? Although this is theoretically possible, in practice it comes with fundamental disadvantages that can quickly become costly problems. A tightly coupled system like this requires far more effort as well as in depth protocol and programming skills. Such a system is then cumbersome to administer and not scalable. Most importantly, it lacks agility when introducing changes such as adding new data sources, services or applications. Thus a “pragmatic” 1:1 connectivity approach actually slows down the IIoT responsibles’ ability for business enablement where it is really needed to accelerate.
At this point, it is worth moving from the very detailed example of MQTT and OPC UA to a broader picture, because IIoT is a topic full of diversity and dynamics.
In contrast to the 1:1 connectivity approach, the Connectware IIoT Edge Platform enables (m)any-to-(m)any connectivity between pretty much any OT and IT data endpoints. From a strategic point of view, Connectware, acting as a “technology-neutral layer”, provides limitless compatibility in the IIoT ecosystem while maintaining convenient independence from powerful providers and platforms. It provides a unified, standardised and systematic environment that is made to fit expert users’ preferences. On this basis, IIoT responsibles can leverage key tactical benefits such as data governance, workflow automation and advanced security. You can read more about these aspects and dive into more operational capabilities in related articles.
This guide is to help you connect to an OPC UA server, using Connectware. It assumes that you understand the fundamental Connectware concepts. For that you can check out the Technical Overview. To follow the example, you should have a Connectware instance running. If you don’t have that, learn Installing Cybus Connectware. Although we focus on OPC UA here, you should also be familiar with MQTT. If in doubt, head over to MQTT Basics.
You will learn to integrate OPC UA servers into your Connectware use case. Everything you need to get started will be covered in the following topics:
Service YAMLs used in this lesson are available on GitHub.
Our example utilizes the OPC UA server at opcuaserver.com, because it is publicly available. You can of course bring your own device instead.
This guide recommends using FreeOpcUa’s Simple OPC UA GUI client for exploration. It is open source and offers convenient installation on Windows, Linux and Mac. If you prefer working on the terminal, go for Etienne Rossignon’s opcua-commander. If you have another option available, you may as well stick to it.
Let’s get started! Launch your OPC UA browser and connect to the endpoint opc.tcp://opcuaserver.com:48010 (or whatever endpoint applies to the device you brought). Tada! – the three root nodes Objects, Types, and Views should show up.
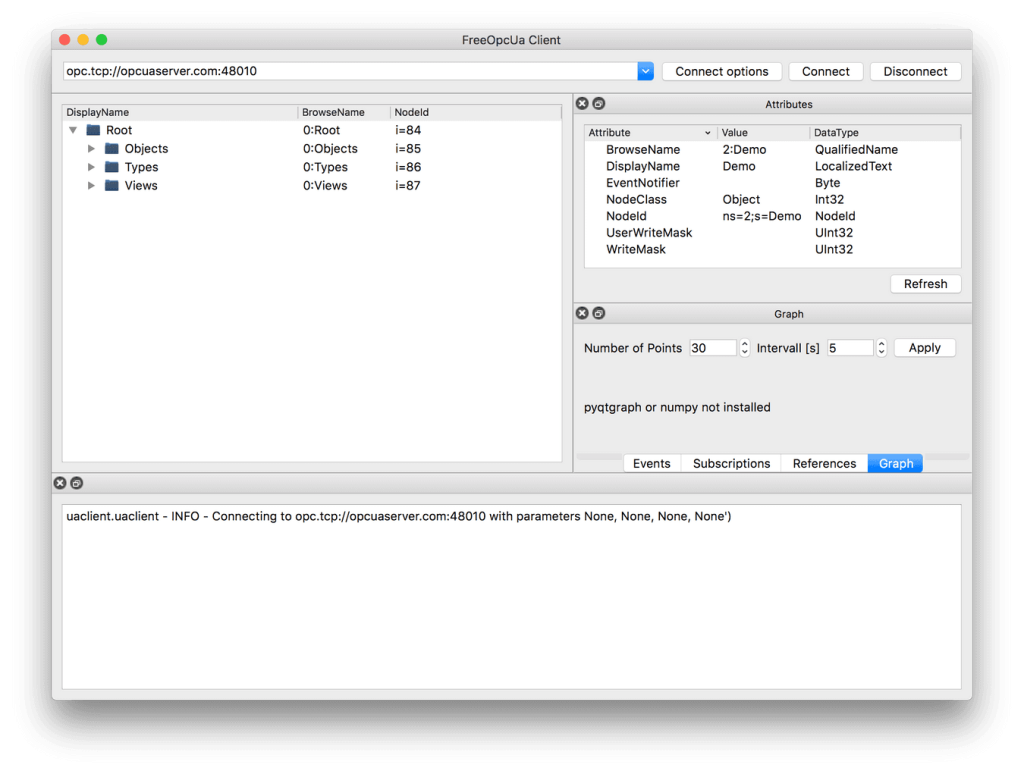
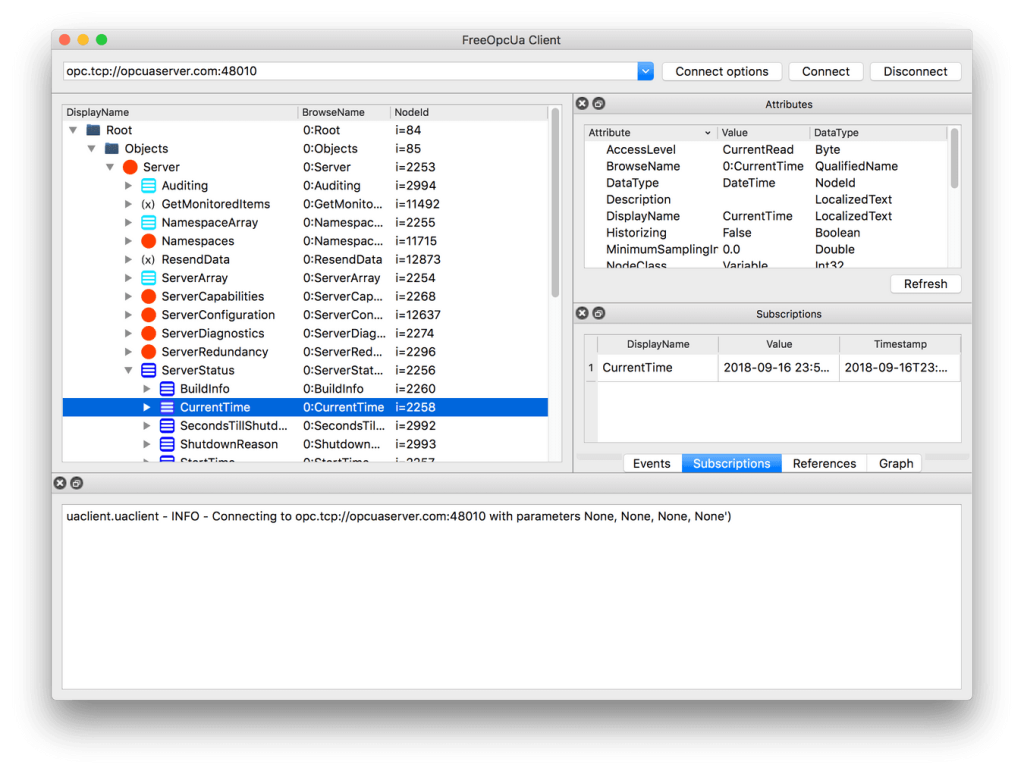
Explore and find the node which is displayed as CurrentTime. Select it and take a look at the Attributes pane – according to the NodeClass attribute we are dealing with a Variable which, by specification, contains a Value attribute. Variable nodes allow us to read and write data, depending on the AccessLevel attribute.
Right click on CurrentTime and select subscribe to data change. The Subscriptions pane then shows the actual value and it is updating at a fast rate.
Now we know that Variable nodes in the OPC UA address space are the datasources, but how to make use of them with Connectware? There are two ways to reference them:
NodeId, which is a node’s unique identifier. For example, the CurrentTime variable’s NodeId is i=2258.BrowsePath, which is the path of BrowseName when you navigate the treeview. For example, the CurrentTime variable’s BrowsePath assembles to /0:Objects/0:Server/0:ServerStatus/0:CurrentTime.Both approaches have their pros and cons. In general, the NodeId is less clumsy, but less descriptive. In this example, we prefer the NodeId and recreate the tree structure semantics with the help of MQTT mappings.
Below, there is a table of variables to use in the example. Most variables are read-only, except for the Temperature Setpoint, which allows us to actually control something.
|Variable             |NodeId                                      |BrowsePath                                                               |AccessLevel              |
|–––––––––––––––––––––|––––––––––––––––––––––––––––––––––––––––––––|–––––––––––––––––––––––––––––––––––––––––––––––––––––––––––––––––––––––––|–––––––––––––––––––––––––|
|CurrentTime          |i=2258                                      |/0:Objects/0:Server/0:ServerStatus/0:CurrentTime                         |CurrentRead              |
|Humidity             |ns=3;s=AirConditioner_1.Humidity            |/0:Objects/3:BuildingAutomation/3:AirConditioner_1/3:Humidity            |CurrentRead              |
|Power Consumption    |ns=3;s=AirConditioner_1.PowerConsumption    |/0:Objects/3:BuildingAutomation/3:AirConditioner_1/3:PowerConsumption    |CurrentRead              |
|Temperature          |ns=3;s=AirConditioner_1.Temperature         |/0:Objects/3:BuildingAutomation/3:AirConditioner_1/3:Temperature         |CurrentRead              |
|Temperature Setpoint |ns=3;s=AirConditioner_1.TemperatureSetPoint |/0:Objects/3:BuildingAutomation/3:AirConditioner_1/3:TemperatureSetPoint |CurrentRead, CurrentWrite|
Code-Sprache: YAML (yaml)The Service YAML is used to specify connections, endpoints and mappings for Connectware to handle. Create a new file in a text editor, e.g. opcua-example-service.yml. This example adds minimal content, to not distract the eye. For a complete reference of properties you can check out the Structure of the commissioning file.
These contain some general information. You can give a short description and add a stack of metadata. Regarding the metadata, only the name is required while the rest is optional. We will just use the following set of information for this lesson:
description: >
 OPC UA Example Service
 Cybus Knowledge Base - How to connect an OPC UA server

metadata:
 name: OPC UA Example Service
Code-Sprache: YAML (yaml)
Parameters can be adjusted in the Connectware Web UI. We are defining the address details of our OPC UA server as parameters, so they are used as default, but can be customized in case we want to connect to a different server.
parameters:

 opcuaHost:
   type: string
   description: OPC UA Host Address
   default: opcuaserver.com

 opcuaPort:
   type: integer
   description: OPC UA Host Port
   default: 48010
Code-Sprache: YAML (yaml)The first resource we need is a connection to the OPC UA server.
opcuaConnection:
   type: Cybus::Connection
   properties:
     protocol: Opcua
     connection:
       host: !ref opcuaHost
       port: !ref opcuaPort
       #username: myUsername
       #password: myPassword
Code-Sprache: YAML (yaml)
If you are using a username and password, you could also create parameters, to make them configurable. In our case the server does not require credentials.
  currentTime:
   type: Cybus::Endpoint
   properties:
     protocol: Opcua
     connection: !ref opcuaConnection
     topic: server/status/currenttime
     subscribe:
       nodeId: i=2258


 Humidity:
   type: Cybus::Endpoint
   properties:
     protocol: Opcua
     connection: !ref opcuaConnection
     topic: building-automation/airconditioner/1/humidity
     subscribe:
       nodeId: ns=3;s=AirConditioner_1.Humidity
       #browsePath: /0:Objects/3:BuildingAutomation/3:AirConditioner_1/3:Humidity

 PowerConsumption:
   type: Cybus::Endpoint
   properties:
     protocol: Opcua
     connection: !ref opcuaConnection
     topic: building-automation/airconditioner/1/power-consumption
     subscribe:
       nodeId: ns=3;s=AirConditioner_1.PowerConsumption

 Temperature:
   type: Cybus::Endpoint
   properties:
     protocol: Opcua
     connection: !ref opcuaConnection
     topic: building-automation/airconditioner/1/temperature
     subscribe:
       nodeId: ns=3;s=AirConditioner_1.Temperature

 TemperatureSetpointSub:
   type: Cybus::Endpoint
   properties:
     protocol: Opcua
     connection: !ref opcuaConnection
     topic: building-automation/airconditioner/1/temperature-setpoint
     subscribe:
       nodeId: ns=3;s=AirConditioner_1.TemperatureSetPoint


 TemperatureSetpointWrite:
   type: Cybus::Endpoint
   properties:
     protocol: Opcua
     connection: !ref opcuaConnection
     topic: building-automation/airconditioner/1/temperature-setpoint
     write:
       nodeId: ns=3;s=AirConditioner_1.TemperatureSetPoint
       #browsePath: /0:Objects/3:BuildingAutomation/3:AirConditioner_1/3:TemperatureSetPoint
Code-Sprache: YAML (yaml)
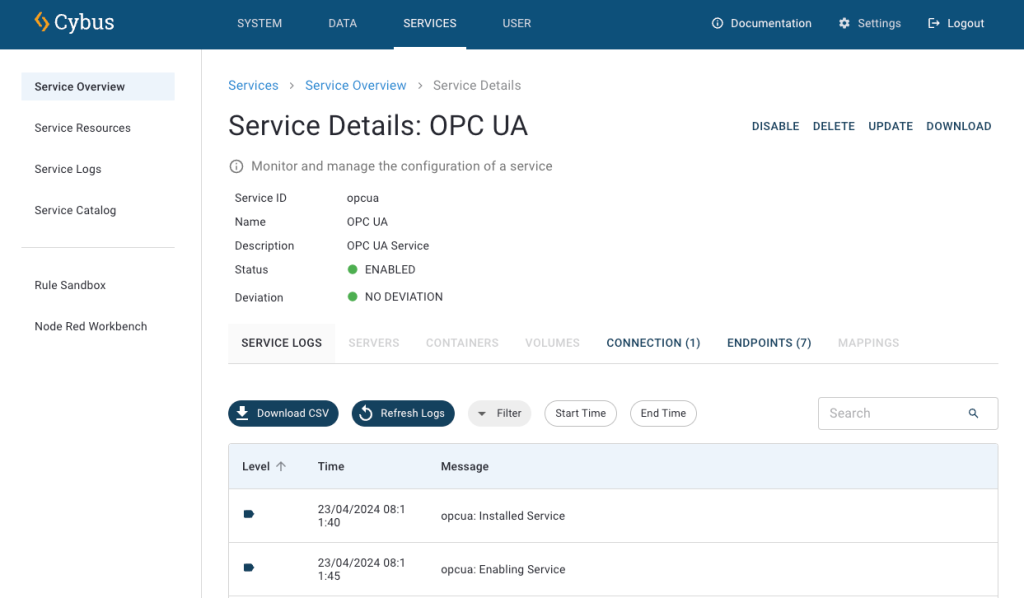
To see the incoming data, click Data on the navigation panel. In the Data Explorer list, you can see the MQTT topic we specified in the commissioning file. To see data from a specific topic/endpoint, navigate to the corresponding topic in Available Topics list. This makes Connectware subscribe to topic and display its values on the Monitored Topics. In the History section on the bottom right, you will find all the data received since you subscribed to the topics.
First, we used an OPC UA client application to browse the address space. This allowed us to pick the variables of our interest and to reference them by their NodeId, or by BrowsePath. Given that information, we created a Service YAML and installed the Service on Connectware. In the Explorer we finally saw the live data on corresponding MQTT topics and are now ready to go further with our OPC UA integration.
Why not store the OPC UA data in a time series database and display it on a dashboard for instance?
Sie müssen den Inhalt von reCAPTCHA laden, um das Formular abzuschicken. Bitte beachten Sie, dass dabei Daten mit Drittanbietern ausgetauscht werden.
Mehr InformationenSie sehen gerade einen Platzhalterinhalt von Turnstile. Um auf den eigentlichen Inhalt zuzugreifen, klicken Sie auf die Schaltfläche unten. Bitte beachten Sie, dass dabei Daten an Drittanbieter weitergegeben werden.
Mehr InformationenSie sehen gerade einen Platzhalterinhalt von Facebook. Um auf den eigentlichen Inhalt zuzugreifen, klicken Sie auf die Schaltfläche unten. Bitte beachten Sie, dass dabei Daten an Drittanbieter weitergegeben werden.
Mehr InformationenSie sehen gerade einen Platzhalterinhalt von Instagram. Um auf den eigentlichen Inhalt zuzugreifen, klicken Sie auf die Schaltfläche unten. Bitte beachten Sie, dass dabei Daten an Drittanbieter weitergegeben werden.
Mehr InformationenSie sehen gerade einen Platzhalterinhalt von X. Um auf den eigentlichen Inhalt zuzugreifen, klicken Sie auf die Schaltfläche unten. Bitte beachten Sie, dass dabei Daten an Drittanbieter weitergegeben werden.
Mehr Informationen