To uninstall Connectware use the helm uninstall command on your Connectware on Kubernetes installation:
helm uninstall -n <namespace> <installation-name>
Code-Sprache: YAML (yaml)Some resources will intentionally not be removed, like some persistent volume claims, and potentially ConfigMaps and Secrets manually created for mTLS.
If you want to completely clean up, for example for a fresh install, use this command to identify the resources:
kubectl -n <namespace> get all,cm,secret,pvc
Code-Sprache: YAML (yaml)
Keep in mind that some resources are part of a standard Kubernetes namespace, for example configmap/kube-root-ca.crt or service/kubernetes. After identifying the resources for cleanup use this command to to remove them:
kubectl -n <namespace> delete <resource-1> <resource-2> <resource-n>
Code-Sprache: YAML (yaml)
Example:
kubectl -n <namespace> delete persistentvolumeclaim/brokerdata-broker-0
persistentvolumeclaim/brokerdata-broker-1 configmap/cw-mtls-ca-cert
secret/cw-mtls-welder-robots
persistentvolumeclaim/brokerdata-control-plane-broker-0
persistentvolumeclaim/brokerlog-control-plane-broker-0
persistentvolumeclaim/postgresql-postgresql-0
persistentvolumeclaim/certs
Code-Sprache: YAML (yaml)
Hint: If you plan a fresh installation in the same location it is especially important to remove persistentvolumeclaim/postgresql-postgresql-0 and persistentvolumeclaim/certs.
The disk space needed for our brokers depends on customers use-cases, especially in regards to use of QoS > 0 and retained messages, as well as message size. We can therefore not perfectly predict the necessary disk space, allowing for a situation in which existing volumes need to be resized.
This procedure can be used to increase the available disk space for broker volumes with as little service interruption as possible. Currently this means pod restarts, which result in the necessity for clients to reconnect.
This guide can be used for control-plane-broker by replacing any mention of broker with control-plane-broker.
Important: This procedure depends on removing the StatefulSet. This leaves the broker cluster open to failures caused by cluster events or human error. Therefore this should be executed with great care and only in a stable cluster!
kubectl access to the necessary installation and the current context namespace set to the target namespace (kubectl config set-context --current --namespace <target-namespace>)kubectl get sc and check that ALLOWVOLUMEEXPANSION show true for the StorageClass used for the volumeskubectl get sts broker shows READY 2/2 or higher, but same number on both sides of the slash)kubectl scale sts broker --replicas 2
Code-Sprache: YAML (yaml)kubectl get sts broker -o yaml > broker.yaml
Code-Sprache: YAML (yaml)Repeat this part for each broker cluster pod you have!
kubectl delete sts broker --cascade=orphan
Code-Sprache: YAML (yaml)$broker to the pod name of the broker you want to resize (e.g. broker-0):broker=broker-0
Code-Sprache: YAML (yaml)kubectl delete pod $broker
Code-Sprache: YAML (yaml)<size> with the Kubernetes Quantity for the volume, e.g. 5Gi):kubectl patch pvc brokerdata-$broker --patch '{"spec": { "resources": {"requests": {"storage": "<size>"}}}}'
Code-Sprache: YAML (yaml)kubectl get pvc brokerdata-$broker
Code-Sprache: YAML (yaml)kubectl apply -f broker.yaml
Code-Sprache: YAML (yaml)kubectl get sts broker shows READY 2/2 or higher, but same number on both sides of the slash)kubectl get pod -lapp=broker -o name | xargs -I % kubectl exec % -- vmq-admin cluster show
Code-Sprache: YAML (yaml)Defaulted container "broker" out of: broker, wait-for-k8s (init)
+-------------------------------------------------+---------+
| Node | Running |
+-------------------------------------------------+---------+
| VerneMQ@broker-0.broker.cybus.svc.cluster.local | true |
+-------------------------------------------------+---------+
| VerneMQ@broker-1.broker.cybus.svc.cluster.local | true |
+-------------------------------------------------+---------+
Defaulted container "broker" out of: broker, wait-for-k8s (init)
+-------------------------------------------------+---------+
| Node | Running |
+-------------------------------------------------+---------+
| VerneMQ@broker-0.broker.cybus.svc.cluster.local | true |
+-------------------------------------------------+---------+
| VerneMQ@broker-1.broker.cybus.svc.cluster.local | true |
+-------------------------------------------------+---------+
Code-Sprache: YAML (yaml)Once you are done you should adjust your Helm values for Connectware to reflect the changes.
Update the following fields based on what volumes you resized:
| PVC Name | Helm value |
|---|---|
| brokerdata-broker-* | global.broker.storage.data.size |
| brokerlog-broker-* | global.broker.storage.log.size |
| brokerdata-control-plane-broker-* | global.controlPlaneBroker.storage.data.size |
| brokerlog-control-plane-broker-* | global.controlPlaneBroker.storage.log.size |
Connectware protocol-mapper agents are additional components of the Connectware that can be deployed and started individually. You can use agents for the following:
Related Links
You can add additional agents to your Connectware installation via the Connectware Helm chart. The section to add agents is commented out by default.
Example
In this example, two agents are added to the protocolMapperAgents section of the values.yaml file.
protocolMapperAgents:
  - name: welder-robots
  - name: bender-robots
Code-Sprache: YAML (yaml)Agents require a persistent volume to store their data. The default storage size value is 40 Mi (40 Mebibytes).
Note: You cannot change the storage size of an agent after creating it.
Example
protocolMapperAgents:
  - name: bender-robots
    storageSize: 1Gi
Code-Sprache: YAML (yaml)
Related Links
Agents require a persistent volume to store their data. By default, the agents use the default storage class of the Kubernetes cluster. You can specify any Kubernetes StorageClass that offers the ReadWriteOnce access mode and is available in your Kubernetes cluster.
Example
protocolMapperAgents:
  - name: bender-robots
    storageClassName: longhorn
Code-Sprache: YAML (yaml)
Related Links
You can use the Kubernetes resource requests and limits to specify CPU and memory resources for agents.
Depending on their role and workload, agents can consume varying amounts of CPU and memory resources. We recommend that you use the Kubernetes metrics-server to identify the resource requirements of each agent and adjust the configuration if necessary.
Important: Adjusting CPU and memory resources can impact the performance and availability of Connectware. When you customize the settings for CPU and memory resources, make sure that you monitor the performance and make adjustments if necessary.
Example
protocolMapperAgents:
- name: bender-robots
  resources:
      requests:
        cpu: 1000m
        memory: 1000Mi
      limits:
        cpu: 2000m
        memory: 2000Mi
Code-Sprache: YAML (yaml)
Related Links
You can specify a YAML array of objects to add additional environment variables for agents.
Note: Do not specify the following environment variables as they are already used by the Helm chart of Connectware:
Example
protocolMapperAgents:
  - name: bender-robots
    env:
      - name: CYBUS_HOSTNAME_INGRESS
        value: connectware
      - name: SOME_OTHER_VARIABLE
        value: bar
Code-Sprache: YAML (yaml)Agents target the MQTT broker of Connectware through an Ingress proxy via the Kubernetes LoadBalancer Service. In your new Connectware installation, the LoadBalancer is named connectware. However, you can bypass the Ingress proxy. This allows you to reduce the number of services that move data, increase throughput or reduce load.
Note: Only target the MQTT broker directly if the necessity was identified.
Example
Directly target the MQTT broker:
protocolMapperAgents:
  - name: bender-robots
    mqttHost: broker
    mqttDataHost: broker
    env:
      - name: CYBUS_HOSTNAME_INGRESS
        value: connectware
Code-Sprache: YAML (yaml)
Directly target the MQTT broker while using a separate control-plane broker:
protocolMapperAgents:
  - name: bender-robots
    mqttHost: control-plane-broker
    mqttDataHost: broker
    env:
      - name: CYBUS_HOSTNAME_INGRESS
        value: connectware
Code-Sprache: YAML (yaml)You can define sets of labels and annotations that are added to the pod and controller resources of your agents. The following Helm values are available:
| Helm value | Applied to |
|---|---|
| labels | Controller (StatefulSet), Pod, Service, PersistentVolumeClaim |
| service.labels | Service |
| podLabels | Pod |
| annotations | Controller (StatefulSet) |
| podAnnotations | Pod |
| service.annotations | Service |
Example
protocolMapperAgents:
  - name: bender-robots
    labels:
      tld.mycompany/robots: benders # label is common to all resources
    podLabels:
      pod: only # label is only on pods
    annotations:
      controller: only # annotation is only on StatefulSet controller
    podAnnotations:
      pod: only # annotation is only on pods
    service:
      labels:
        service: only # label is only on the service
      annotations:
        service: only # annotations is only on the service
Code-Sprache: YAML (yaml)As an alternative to password-based authentication you can use mutual TLS (mTLS) as the authentication for Connectware. mTLS is an X.509 certificate-based authentication and provides better performance compared to password-based authentication. We recommend using mTLS when handling a large number of agents.
Important: When mTLS is activated, password authentication is no longer possible when using encrypted connections to the Connectware broker (Port TCP/8883 by default).
authentication:
  mTLS:
    enabled: true
Code-Sprache: YAML (yaml)Kubernetes podAntiAffinity is used to ensure replicas of the same workload are not running on the same Kubernetes node to ensure redundancy. All Connectware workloads that support scaling use soft podAntiAffinity by default. The following behaviors can be configured:
| Mode | Behavior of Pods of the same workload (for example: broker) |
|---|---|
| soft (default) | Pods will be spread over different Kubernetes cluster nodes, but may be on the same node |
| hard | Pods will be spread over different Kubernetes cluster nodes, or will fail to be scheduled |
| none | No podAntiAffinity scheduling requirements will be used |
Additionally you can define a topology key, which is a label all Kubernetes nodes need to have for podAntiAffinity to work correctly. By default the label kubernetes.io/hostname is used.
To change the podAntiAffinity behavior you can use the Helm values podAntiAffinity and podAntiAffinityTopologyKey in the services Helm value block. For this example we will use the broker workload:
broker:
  podAntiAffinity: <strong>hard</strong>
  podAntiAffinityTopologyKey: <strong>kubernetes.io/os=linux</strong>
Code-Sprache: YAML (yaml)
Apply the configuration changes via the helm upgrade. For more information, see Applying Helm configuration changes.
Prerequisites
Procedure
Please not that the size of existing volumes can’t be changed through this procedure.
Please use Resizing Broker Volumes in Kubernetes to resize existing volumes, and return to this procedure for the final step of that guide.
The Connectware control-plane-broker uses two volumes, the size of each can be configured through Helm configuration values:
| VOLUME | Purpose | Helm value |
|---|---|---|
| data | Stored retained messages, offline queues and cluster metadata | global.controlPlaneBroker.storage.data.size |
| log | Stores logfiles | global.controlPlaneBroker.storage.log.size |
These values can be filled by a Kubernetes quantity specifying the volume size, for example 5Gi to use a volume of 5 GiB size.
Example
global:
  controlPlaneBroker:
    storage:
      data:
        size: 5Gi
      log:
        size: 500Mi
Code-Sprache: YAML (yaml)
Apply the configuration changes via the helm upgrade. For more information, see Applying Helm configuration changes
Prerequisites
Procedure
Please note that the size of existing volumes can’t be changed through this procedure.
Please use Resizing Broker Volumes in Kubernetes to resize existing volumes, and return to this procedure for the final step of that guide.
The Connectware MQTT broker uses two volumes, the size of each can be configured through Helm configuration values:
| VOLUME | PURPOSE | HELM VALUE |
|---|---|---|
| data | Stored retained messages, offline queues and cluster metadata | global.broker.storage.data.size |
| log | Stores logfiles | global.broker.storage.log.size |
These values can be filled by a Kubernetes quantity specifying the volume size, for example 5Gi to use a volume of 5 GiB size.
Example
global:
  broker:
    storage:
      data:
        size: 5Gi
      log:
        size: 500Mi
Code-Sprache: YAML (yaml)
Apply the configuration changes via the helm upgrade. For more information, see Applying Helm configuration changes
The connectware-agent Helm chart uses Kubernetes inter-pod anti-affinity to distribute configured agents across different Kubernetes nodes. The chart offers three modes of anti-affinity which you can choose with the podAntiAffinity value inside the agent’s entry in the protocolMapperAgents context of your values.yaml file:
| Mode | Effect |
|---|---|
soft (default) | Will try to schedule agent pods on different Kubernetes nodes, but will schedule them on the same node if not possible otherwise. |
hard | Will schedule agent pods only on different nodes. If there are not enough matching nodes available, agents will not be scheduled. |
none | Will not add anti-affinity rules to the agents. |
Example
protocolMapperAgentDefaults:
  connectwareHost: connectware.cybus # adjust to actual hostname of Connectware
  podAntiAffinity: hard # agents will only be scheduled on different Kubernetes nodes
protocolMapperAgents:
  - name: bender-robots
  - name: welder-robots # will not be scheduled on the same Kubernetes node as bender-robots agent
Code-Sprache: YAML (yaml)If you want to configure very specific pod anti-affinity rules to match your Kubernetes cluster setup, you can use the values of the podAntiAffinityOptions section inside the agent’s entry in the protocolMapperAgents section of your values.yaml file.
To change topology key used for the agent’s pod anti-affinity, specify the topology key in the podAntiAffinityOptions.topologyKey value inside the agent’s entry in the protocolMapperAgents context of your values.yaml file.
Example
protocolMapperAgentDefaults:
  connectwareHost: connectware.cybus # adjust to actual hostname of Connectware
  podAntiAffinity: hard # agents will only be scheduled on different availability zones
  podAntiAffinityOptions:
    topologyKey: topology.kubernetes.io/zone
protocolMapperAgents:
  - name: bender-robots
  - name: welder-robots # will not be scheduled on the same availability zone as bender-robots agent
Code-Sprache: YAML (yaml)To change match expression used for the agent’s pod anti-affinity, specify the values podAntiAffinityOptions.key, podAntiAffinityOptions.operator, podAntiAffinityOptions.value, value inside the agents entry in the protocolMapperAgents section of your values.yaml file.
Example
protocolMapperAgentDefaults:
  connectwareHost: connectware.cybus # adjust to actual hostname of Connectware
  # Agents will not be scheduled on the same Kubernetes nodes as other agents.
  # This is also true for agents installed through other instances of this Helm chart.
  podAntiAffinity: hard
  podAntiAffinityOptions:
    key: app.kubernetes.io/component
    operator: In
    value: protocol-mapper-agent
protocolMapperAgents:
  - name: bender-robots
  - name: welder-robots # will not be scheduled on the same Kubernetes node as bender-robots agent
Code-Sprache: YAML (yaml)
You can access the Connectware Admin UI through the Kubernetes LoadBalancer Service. In your new Connectware installation, the LoadBalancer is named connectware. How to access the LoadBalancer depends on which LoadBalancer provider your cluster offers.
Kubectl -n <namespace> get svc/connectware
Code-Sprache: YAML (yaml)Kubectl -n <namespace> port-forward svc/connectware 10443:443
Code-Sprache: YAML (yaml)Result: Your Connectware on Kubernetes installation is now ready.
By default, agents use a password for authentication. As an alternative to password-based authentication you can use mutual TLS (mTLS) as the authentication mechanism for agents. mTLS is an X.509 certificate-based authentication and provides better performance compared to password-based authentication. We recommend using mTLS when handling a large number of agents.
Prerequisites
openssl.Procedure
To configure agents for mTLS, do the following:
In order to use mTLS authentication, you must extract the Certificate Authority (CA) that Connectware uses to sign certificates that are created for you agents. You can extract the certificate from Connectware or replace it with a CA certificate that you already have. In both cases, you must extract the truststore that Connectware uses, as well as the affiliated private key.
The steps in this section are executed in your Connectware installation, not your connectware-agent installation
Note: For production setups, we recommend that you replace the Public Key Infrastructure (PKI) that is generated during the Connectware installation with a PKI that is managed and approved by your company.
To extract the existing CA key pair, use kubectl cp to copy the certificate from the running auth-server pod via the following commands. Make sure to specify the Kubernetes namespace that contains the Connectware installation.
namespace=<namespace>
pod=$(kubectl -n ${namespace} get pod -o name -lapp.kubernetes.io/name=auth-server | head -1 | sed 's/pod///g');
kubectl -n ${namespace} cp -c auth-server $pod:/connectware_certs/cybus_ca.key cybus_ca.key
kubectl -n ${namespace} cp -c auth-server $pod:/connectware_certs/cybus_ca.crt cybus_ca.crt
Code-Sprache: YAML (yaml)
Result
The files cybus_ca.crt and cybus_ca.key are created in your current directory.
For production setups, we recommend that you use a Certificate Authority (CA) that is managed and approved by your company. You can append the certificate of your CA or a valid intermediate CA to the certificate truststore that Connectware uses.
Prerequisites
The following files are available:
Procedure
cat ca-chain.pem >> cybus_ca.crt
Code-Sprache: YAML (yaml)namespace=<namespace>
pod=$(kubectl -n ${namespace} get pod -o name -lapp.kubernetes.io/name=auth-server | head -1 | sed 's/pod///g');
kubectl -n ${namespace} cp -c auth-server cybus_ca.crt $pod:/connectware_certs/cybus_ca.crt
kubectl -n ${namespace} cp -c auth-server server.crt $pod:/connectware_certs/cybus_server.crt
kubectl -n ${namespace} cp -c auth-server server.key $pod:/connectware_certs/cybus_server.key
kubectl -n ${namespace} exec $pod -c auth-server -- chown -R root.root /connectware_certs
kubectl -n ${namespace} exec $pod -c auth-server -- chmod 664 /connectware_certs/cybus_ca.crt
kubectl -n ${namespace} exec $pod -c auth-server -- chmod 664 /connectware_certs/cybus_ca.key
kubectl -n ${namespace} exec $pod -c auth-server -- chmod 664 /connectware_certs/cybus_server.crt
kubectl -n ${namespace} exec $pod -c auth-server -- chmod 664 /connectware_certs/cybus_server.key
Code-Sprache: YAML (yaml)namespace=<namespace> kubectl -n ${namespace} rollout restart deployment connectware
Code-Sprache: YAML (yaml)Every agent needs a certificate key pair that is signed by the Certificate Authority (CA) that you want to use. We will assume that the certificate CA files are named cybus_ca.crt and cybus_ca.key and in your current directory.
Note: If you have already signed certificates for your agents, skip this task and continue with Configuring the agent to use your key pair.
The exact parameters for the key pair are subject to your preferences and security requirements. The commands used here are meant as an example.
openssl genrsa -out tls.key 4096
Code-Sprache: YAML (yaml)openssl req -new -key tls.key -out tls.csr
Code-Sprache: YAML (yaml)Common Name (e.g. server FQDN or YOUR name) to the exact name of the agent that you are generating a certificate for.openssl x509 -req -in tls.csr -CA cybus_ca.crt -CAkey cybus_ca.key -CAcreateserial -out tls.crt -days 365 -sha256
Code-Sprache: YAML (yaml)If you are using other file names than the ones that we are using in this documentation, make sure to use them in the command.
Result
The certificate is created. The certificate is valid for one year. Make sure to create new certificates before the old certificates expire to avoid impact on the operation of the corresponding agents.
You can configure key pairs for agents in your values.yaml file or you can create a Kubernetes Secret before you deploy your agent.
Each method has its advantages. However, the most important difference is that a key is considered private data, like a password. If you do not want to store this information in your unencrypted values.yaml file, we recommend that you use the Kubernetes Secret.
You can configure the key pair in the mTLS.keyPair section inside the agents entry in protocolMapperAgents context of your values.yaml file. Alternatively you can create a Kubernetes secret before you deploy your agent.
Each method has its advantages. However, the most important difference is that a key is considered private data, like a password. If you do not want to store this information in your plain text values.yaml file, we recommend that you use the Kubernetes secret.
To add the key pair to your Helm values, add the respective files as literal block scalars to these Helm values inside the agents entry in protocolMapperAgents context of your values.yaml file:
| Value | Content |
|---|---|
mTLS.keyPair.cert | The certificate you generated for the agent (tls.crt) as a literal block scalar |
mTLS.keyPair.key | The key you generated for the agent (tls.key) as a literal block scalar |
Make sure to stick to the YAML indentation rules. Indent the certificate and key by two spaces relative to cert/key, see the example.
Example
protocolMapperAgents:
  - name: bender-robots
    mTLS:
      keyPair:
        cert: |
          -----BEGIN CERTIFICATE-----
          IIEgTCCAmkCFCN+Wi9RpeajIunZnxdIhvdZep6ZMA0GCSqGSIb3DQEBCwUAMIGN
          [skipped for brevity - include whole certificate]
          sD9hY3o=
          -----END CERTIFICATE-----
        key: |
          -----BEGIN PRIVATE KEY-----
          IIEvQIBADANBgkqhkiG9w0BAQEFAASCBKcwggSjAgEAAoIBAQCg+mC1iGmz+qCO
          [skipped for brevity - include whole private key]
          nJn5oNH9lcodhXcuOYVg3kQ=
          -----END PRIVATE KEY-----
Code-Sprache: YAML (yaml)If you want to manually manage the certificate and key as a Kubernetes secret you will need to create it before configuring your agent. You can use any process you like, as long as the result is a Kubernetes secret that:
connectware-agent installationWe will demonstrate how to create this secret through kubectl. Please ensure that your agent certificate is stored in a file named tls.crt and your key is stored in a file named tls.key.
Define a name for your secret. You will need this name later to configure the agent, so keep it at hand. We recommend choosing a name following the scheme “<chart-name>-<release-name>-<agent-name>-mtls”. Some characters, most prominently the “.” character will be replaced by “-” characters in the agent name.
For example if your agent is named bender-robots and you named your installation “connectware-agent” as used in our docs, the name should be “connectware-agent-bender-robots-mtls”. If you follow this naming convention you will need to include less configuration in your values.yaml.
If you are unsure how to name the secret, you can first deploy your agent without the mTLS configuration, and check the name of its StatefulSet using kubectl get sts. The secret should have the same name with the suffix “-mtls”.
Example
kubectl -n <namespace> create secret tls <secret-name> --key="./tls.key" --cert="./tls.crt"
Code-Sprache: YAML (yaml)If you followed the naming convention of “<chart-name>-<release-name>-<agent-name>-mtls” you don’t need to configure the name of the secret, as this name will be assumed. If you have chosen a different name you need to specify it in the Helm value mTLS.keyPair.existingSecret inside the agents entry in protocolMapperAgents context of your values.yaml file.
Example
protocolMapperAgents:
  - name: bender-robots
    mTLS:
      keyPair:
        existingSecret: <secret-name>
Code-Sprache: YAML (yaml)There are two ways you can configure your agent to use the Certificate Authority (CA):
To add the CA certificate to your Helm values, add the file as literal block scalar to the Helm value mTLS.caChain.cert inside the agents entry in protocolMapperAgents section of your values.yaml file.
Make sure to pay attention to indentation of your CA certificate, it needs to be indented by two spaces relative to cert and keep this indentation (see Example).
If you configure more than one agent, it is recommended to provide the CA certificate through protocolMapperAgentDefaults instead of protocolMapperAgents, because it should be the same for all agents.
Example
protocolMapperAgents:
  - name: bender-robots
    mTLS:
      caChain:
        cert: |
          -----BEGIN CERTIFICATE-----
          MIIFpTCCA40CFGFL86145m7JIg2RaKkAVCOV1H71MA0GCSqGSIb3DQEBCwUAMIGN
          [skipped for brevity - include whole certificate]
          SKnBS1Y1Dn2e
          -----END CERTIFICATE-----
Code-Sprache: YAML (yaml)Alternatively, you can provide the CA certificate as a Kubernetes ConfigMap.
If you want to manually manage the CA certificate as a Kubernetes ConfigMap you will need to create it before configuring your agent. You can use any process you like, as long as the result is a Kubernetes ConfigMap that:
connectware-agent installationWe will demonstrate how to create this ConfigMap through kubectl. Please ensure that your CA certificate is stored in a file named ca-chain.pem. Because the CA certificate extracted from Connectware it is named cybus_ca.crt we will create a copy in our example.
Define a name for your ConfigMap. You will need this name later to configure the agent, so keep it at hand. We recommend choosing a name following the scheme “<chart-name>-<release-name>-<agent-name>-mtls-ca-cert”. Some characters, most prominently the “.” character will be replaced by “-” characters in the agent name.
For example if you named your installation “connectware-agent” as used in our docs, the name should be “connectware-agent-mtls-ca-cert”. If you follow this naming convention you will need to include less configuration in your values.yaml.
Example
cp cybus_ca.crt ca-chain.pem
kubectl create configmap <configmap-name> --from-file ca-chain.pem
Code-Sprache: YAML (yaml)If you followed the naming convention of “<chart-name>-<release-name>-<agent-name>-mtls-ca-cert” you don’t need to configure the name of the ConfigMap, as this name will be assumed. If you have chosen a different name you need to specify it in the Helm value mTLS.caChain.existingConfigMap inside the agents entry in protocolMapperAgents context of your values.yaml file
If you configure more than one agent, it is recommended to provide the CA certificate through protocolMapperAgentDefaults instead of protocolMapperAgents, because it should be the same for all agents.
Example
protocolMapperAgents:
  - name: bender-robots
    mTLS:
      caChain:
        existingConfigMap: <configmap-name>
Code-Sprache: YAML (yaml)Finally you will need to enable mTLS for the agent. To do this set the Helm value mTLS.enabled to true inside the agents entry in protocolMapperAgents section of your values.yaml file.
Example
protocolMapperAgents:
  - name: bender-robots
    mTLS:
      enabled: true
Code-Sprache: YAML (yaml)
To apply this configuration to your agent you need to use Helm upgrade on your connectware-agent installation with the same parameters you originally used.
Example
helm upgrade connectware-agent cybus/connectware-agent -f values.yaml -n <namespace>
Code-Sprache: YAML (yaml)If you want to replace certificates or keys you follow the same steps as when adding them, however the agents will not automatically start using the new certificates. You will need to manually restart the Kubernetes StatefulSets associated with the agents for which you replaced certificates. This StatefulSet is named “<chart-name>-<release-name>-<agent-name>”. Some characters, most prominently the “.” character will be replaced by “-” characters in the agent name.
If you followed the recommendations in these docs the first two parts are abbreviated to “connectware-agent”. An agent named “bender-robots” for example would then be deployed as a StatefulSet named “connectware-agent-bender-robots”.
kubectl -n <namespace> rollout restart sts <statefulset-name>
Code-Sprache: YAML (yaml)
This will restart the agent and apply the new certificates/key.
If you want to restart all agents from your installation, you can use this command in combination with the name you gave to your agent deployment:
kubectl -n <namespace> rollout restart sts -l app.kubernetes.io/instance=<release-name>
Code-Sprache: YAML (yaml)
If you followed the recommendations in these docs, <release-name> is “connectware-agent”.
This example assumes:
connectware-agent Helm installation “connectware-agent”.licenseKey: <your-connectware-license-key>
protocolMapperAgentDefaults:
connectwareHost: connectware.cybus
mTLS:
enabled: true
protocolMapperAgents:
- name: bender-robots
- name: welder-robots
Code-Sprache: YAML (yaml)This example assumes:
connectware-agent Helm installation “connectware-agent”.licenseKey: <your-connectware-license-key>
protocolMapperAgentDefaults:
connectwareHost: connectware.cybus
mTLS:
enabled: true
caChain:
existingConfigMap: my-ca-cert
protocolMapperAgents:
- name: bender-robots
mTLS:
keypair:
existingSecret: mtls-keypair-1
- name: welder-robots
mTLS:
keypair:
existingSecret: mtls-keypair-2
Code-Sprache: YAML (yaml)This example assumes:
connectware-agent Helm installation “connectware-agent”.licenseKey: <your-connectware-license-key>
protocolMapperAgentDefaults:
connectwareHost: connectware.cybus
mTLS:
enabled: true
protocolMapperAgents:
- name: bender-robots
mTLS:
keyPair:
cert: |
-----BEGIN CERTIFICATE-----
MIIEgTCCAmkCFCN+Wi9RpeajIunZnxdIhvdZep6ZMA0GCSqGSIb3DQEBCwUAMIGN
[skipped for brevity - include whole certificate]
sD9hY3o=
-----END CERTIFICATE-----
key: |
-----BEGIN PRIVATE KEY-----
MIIEvQIBADANBgkqhkiG9w0BAQEFAASCBKcwggSjAgEAAoIBAQCg+mC1iGmz+qCO
[skipped for brevity - include whole private key]
nJn5oNH9lcodhXcuOYVg3kQ=
-----END PRIVATE KEY-----
- name: welder-robots
mTLS:
keyPair:
cert: |
-----BEGIN CERTIFICATE-----
MIIFcjCCA1oCFFgO7SgdLBuU6YBOuZxhQg0eW5f+MA0GCSqGSIb3DQEBCwUAMIGN
[skipped for brevity - include whole certificate]
VM6E0Lqy
-----END CERTIFICATE-----
key: |
-----BEGIN PRIVATE KEY-----
MIIJRAIBADANBgkqhkiG9w0BAQEFAASCCS4wggkqAgEAAoICAQDvmp+v3+x1am6m
[skipped for brevity - include whole private key]
Y6vWPIuRCwum9DxjrdIva6Z6Pqkdyed9
-----END PRIVATE KEY-----
Code-Sprache: YAML (yaml)This example assumes:
connectware-agent Helm installation “connectware-agent”.licenseKey: <your-connectware-license-key>
protocolMapperAgentDefaults:
connectwareHost: connectware.cybus
mTLS:
enabled: true
caChain:
cert: |
-----BEGIN CERTIFICATE-----
MIIFpTCCA40CFGFL86145m7JIg2RaKkAVCOV1H71MA0GCSqGSIb3DQEBCwUAMIGN
[skipped for brevity - include whole certificate]
SKnBS1Y1Dn2e
-----END CERTIFICATE-----
protocolMapperAgents:
- name: bender-robots
mTLS:
keyPair:
cert: |
-----BEGIN CERTIFICATE-----
MIIEgTCCAmkCFCN+Wi9RpeajIunZnxdIhvdZep6ZMA0GCSqGSIb3DQEBCwUAMIGN
[skipped for brevity - include whole certificate]
sD9hY3o=
-----END CERTIFICATE-----
key: |
-----BEGIN PRIVATE KEY-----
MIIEvQIBADANBgkqhkiG9w0BAQEFAASCBKcwggSjAgEAAoIBAQCg+mC1iGmz+qCO
[skipped for brevity - include whole private key]
nJn5oNH9lcodhXcuOYVg3kQ=
-----END PRIVATE KEY-----
- name: welder-robots
mTLS:
keyPair:
cert: |
-----BEGIN CERTIFICATE-----
MIIFcjCCA1oCFFgO7SgdLBuU6YBOuZxhQg0eW5f+MA0GCSqGSIb3DQEBCwUAMIGN
[skipped for brevity - include whole certificate]
VM6E0Lqy
-----END CERTIFICATE-----
key: |
-----BEGIN PRIVATE KEY-----
MIIJRAIBADANBgkqhkiG9w0BAQEFAASCCS4wggkqAgEAAoICAQDvmp+v3+x1am6m
[skipped for brevity - include whole private key]
Y6vWPIuRCwum9DxjrdIva6Z6Pqkdyed9
-----END PRIVATE KEY-----
Code-Sprache: YAML (yaml)As with any workload in Kubernetes, Connectware needs to have all its pods in the STATUS Running and with all containers READY. You can see this by them showing the same number left and right of the / when running kubectl get pods on your Connectware installation’s namespace:
$ kubectl get pods
Code-Sprache: YAML (yaml)| NAME | READY | STATUS | RESTARTS | AGE |
|---|---|---|---|---|
| admin-web-app-8649f98fc6-sktb7 | 1/1 | Running | 0 | 3m1s |
| auth-server-5f46964984-5rwvc | 1/1 | Running | 0 | 2m39s |
| broker-0 | 1/1 | Running | 0 | 2m11s |
| broker-1 | 1/1 | Running | 0 | 2m50s |
| connectware-5b948ffdff-tj2x9 | 1/1 | Running | 0 | 2m41s |
| container-manager-5f5678657c-94486 | 1/1 | Running | 0 | 2m46s |
| control-plane-broker-0 | 1/1 | Running | 0 | 2m4s |
| control-plane-broker-1 | 1/1 | Running | 0 | 2m48s |
| doc-server-6b486bb5cb-fkpdb | 1/1 | Running | 0 | 3m |
| ingress-controller-85fffdcb4b-m8kpm | 1/1 | Running | 0 | 2m37s |
| postgresql-0 | 1/1 | Running | 0 | 2m58s |
| protocol-mapper-69f59f7dd4-6xhkf | 1/1 | Running | 0 | 2m42s |
| service-manager-6b5fffd66d-gt584 | 1/1 | Running | 0 | 2m52s |
| system-control-server-bd486f5bd-2mkxz | 1/1 | Running | 0 | 2m45s |
| welder-robots-0 | 1/1 | Running | 0 | 2m59s |
| workbench-57d4b59fbb-gqwnb | 1/1 | Running | 0 | 2m38s |
You can identify an unhealthy pod by it displaying a clear error state, or by being stuck in a transitory state for too long, for example this pod is unable to start:
| NAME | READY | STATUS | RESTARTS | AGE |
|---|---|---|---|---|
| auth-server-b4b69ccfd-fvsmz | 0/1 | Init:0/1 | 0 | 8m |
To see the reason for a pods problem you need to use the kubectl describe pod <podname> command and then check the events section at the bottom of the output. In this case the pod wants to use a volume that the Kubernetes cluster cannot provide:
Warning  FailedMount  7m4s kubelet Unable to attach or mount volumes: unmounted volumes=[testfail], unattached volumes=[certs testfail kube-api-access-52xmc]: timed out waiting for the condition
Code-Sprache: YAML (yaml)
To repair a situation like this you need to resolve the underlying issue, which can be a wide array of things that are beyond the scope of the Connectware documentation, and are generally covered by Kubernetes documentation.
If there is no clear reason visible for a problem you should check the logs next, which might give you an indicator of the problem. Checking the logs is covered in the next section.
It is generally a good rule of thumb that issues that exist right after an upgrade or reconfiguration of Connectware are often related to misconfiguration within the Helm values, while problems that start and persist later are connected to cluster infrastructure.
Should you be unable to identify or fix the root cause you might have to involve your support contact.
We recommend using the tool kubetail to easily follow logs of multiple pods (https://github.com/johanhaleby/kubetail).
This tool is a small wrapper around kubectl that allows you to see multiple logs at the same time. If you want to use kubetail please follow the instructions on the project’s Github page to install it. By default kubetail will always follow the logs like kubectl logs -f would.
Here are a few examples of how you can use it, but make sure to check kubetail --help too:
kubetail -n <namespace>
Code-Sprache: YAML (yaml)kubetail broker
Code-Sprache: YAML (yaml)kubetail '(service-manager|protocol-mapper)' -e regex
Code-Sprache: YAML (yaml)You can combine the parameter -s <timeframe> with any other command to display logs from the past up to now:
kubetail broker -s 10m
Code-Sprache: YAML (yaml)kubetail broker --previous
Code-Sprache: YAML (yaml)If the logs you are viewing a missing timestamps you can use the parameter --timestamps for kubetail to add timestamps to each log line:
kubetail broker --timestamps
Code-Sprache: YAML (yaml)If you don’t want to use kubetail as suggested in the previous chapter, you can use kubectl to read logs.
Here are a few examples of how you can use it:
kubectl logs -f <podname>
Code-Sprache: YAML (yaml)kubectl logs -f -l app=broker
Code-Sprache: YAML (yaml)kubectl logs --previous <podname>
Code-Sprache: YAML (yaml)You can combine the parameter –since <timeframe> with any other command to display logs from the past up to now:
kubectl logs -f --since 10m <podname>
Code-Sprache: YAML (yaml)If the logs you are viewing a missing timestamps you can use the parameter –timestamps for kubectl to add timestamps to each log line:
kubectl logs -f --timestamps <podname>
Code-Sprache: YAML (yaml)When a pod is in an unhealthy state as covered by the section Checking Pod state or identified through viewing of the logs it is often a good first step to collect the current state into an archive using our collect_debug.sh script from the Connectware Kubernetes Toolkit covered in the section Collecting Debug Information.
Following that you should simply remove this pod using the kubectl delete pod <podname> command. This will cause the owning controller of this pod to create a new instance, which often already solves many issues. Do not be afraid to delete pods when they are unhealthy, as this does not delete any persisted data.
Pay special attention to any pod that does not contain a randomly generated id, but ends in a simple number, for example broker-0. These pods are part of a StatefulSet, which often is treated differently by Kubernetes than most workloads. One of the differences is that an unhealthy pod is not replaced by a newer version automatically, which means you cannot fix a configuration mistake on a StatefulSet without manually deleting the pod. This behavior is meant to protect StatefulSets from automatic processes as they often contain workloads that handle stateful data.
For Connectware StatefulSets include the broker, control-plane-broker, postgresql, and any protocol-mapper agents you defined.
In order to restart Connectware completely you will need to scale all Controller resources to 0 before scaling them back up.
The following guides explain how to do this for different versions of Connectware. Please read the guides carefully to avoid accidentally impacting other workloads on your cluster.
This procedure is meant to work for any version of Connectware on Kubernetes.
Prerequisites
This procedure will scale everything that is currently deployed in the target namespace!
If you have any workload besides Connectware Core Services in this namespace they will be restarted too!
CONNECTWARE_NS=<namespace here>
Code-Sprache: YAML (yaml)kubectl get sts,deployment -n $CONNECTWARE_NS
Code-Sprache: YAML (yaml)BROKER_REPLICAS=$(kubectl get --no-headers -o custom-columns=":spec.replicas" sts broker -n $CONNECTWARE_NS)
Code-Sprache: YAML (yaml)CONTROL_PLANE_REPLICAS=$(kubectl get --no-headers -o custom-columns=":spec.replicas" sts control-plane-broker -n $CONNECTWARE_NS)
Code-Sprache: YAML (yaml)kubectl get deploy,sts -n $CONNECTWARE_NS -o name | xargs -I % kubectl scale -n $CONNECTWARE_NS % --replicas 0
Code-Sprache: YAML (yaml)while [ True ]; do clear; kubectl get pod -n $CONNECTWARE_NS ; sleep 5; done
Code-Sprache: YAML (yaml)kubectl get deploy,sts -n $CONNECTWARE_NS -o name | xargs -I % kubectl scale -n $CONNECTWARE_NS % --replicas 1
Code-Sprache: YAML (yaml)kubectl -n $CONNECTWARE_NS scale sts broker --replicas $BROKER_REPLICAS
Code-Sprache: YAML (yaml)kubectl -n $CONNECTWARE_NS scale sts control-plane-broker --replicas $CONTROL_PLANE_REPLICAS
Code-Sprache: YAML (yaml)while [ True ]; do clear; kubectl get pod -n $CONNECTWARE_NS ; sleep 5; done
Code-Sprache: YAML (yaml)The Connectware Kubernetes Toolkit includes a script named collect_debug.sh which should be used to collect debug information of Connectware’s current state whenever a problem is identified. It is highly recommended to run this tool prior to any attempts to fix a problem.
You can download the script from https://download.cybus.io/connectware-k8s-toolkit/latest/collect_debug.sh.
Example:
wget
https://download.cybus.io/connectware-k8s-toolkit/latest/collect_debug.sh
chmod u+x ./collect_debug.sh
Code-Sprache: YAML (yaml)The script takes parameters to target the correct Kubernetes namespace holding a Connectware installation:
| Parameter | Value | Description |
|---|---|---|
| -n | namespace | The Kubernetes namespace to use |
| -k | path to kubeconfig file | A kubeconfig file to use other than the default (~/.kube/config) |
| -c | name of kubeconfig context | The name of a kubeconfig context different than the currently selected |
If your kubectl command is already configured to point at the correct cluster you can use the script by just specifying the namespace:
./collect_debug.sh -n <namespace>
Code-Sprache: YAML (yaml)
The script will collect logs and state information and create a compressed Tar archive that you can easily archive and send to your support contact.
If you are collecting pod logs in a central log aggregator, please also include these logs for the relevant timeframe.
This section covers commonly occurring problems that often come from small mistakes in the configuration.
Problems related to the usage of Protocol-Mapper agents:
| Symptom | Caused by | Solution |
|---|---|---|
| Agent with mTLS enabled not connecting to broker Agent log shows Reconnecting to mqtts://connectware:8883Broker log shows: [warning] can't authenticate client {"ssl",<<"someName">>} from someIp due to <<"Authentication denied">> | mTLS not enabled in Connectware | Enable mTLS in Connectware as described in Using Mutual Transport Layer Security (mTLS) for agents with the connectware-agent Helm chart. |
| Agent not connecting to broker when mTLS in Connectware is enabled Agent log shows VRPC agent connection to broker lostReconnecting to mqtts://localhost:8883 | mTLS not enabled in agent | Enable mTLS in agent as described in Using Mutual Transport Layer Security (mTLS) for agents with the connectware-agent Helm chart. |
| Agent with mTLS enabled does not connect to broker Agent log shows Error: Client network socket disconnected before secure TLS connection was established | Agent is connecting to the wrong MQTTS port in broker | Verify the parameters mqttPort and mqttDataPort within the agent’s configuration in the protocolMapperAgents section of your Helm values.yaml file are set to the correct ports. If you are not using a modified setup these values are set correctly by default and can be removed from the Helm values. |
| Agent with mTLS enabled does not connect to broker Agent log shows Failed to read certificates during mTLS setup please check the configuration | The certificates provided to the agent are either not found or faulty | Verify that your certificates are generated and configured as described in Using Mutual Transport Layer Security (mTLS) for agents with the connectware-agent Helm chart. One common mistake is to not generate the Kubernetes objects from files with the names ca-chain.pem, tls.crt and tls.key, however these names will be adopted in the Kubernetes objects and subsequently not be found by the agent. |
Allowing an mTLS enabled agent in Connectware Client Registry fails with the message “An Error has occurred – Registration failed”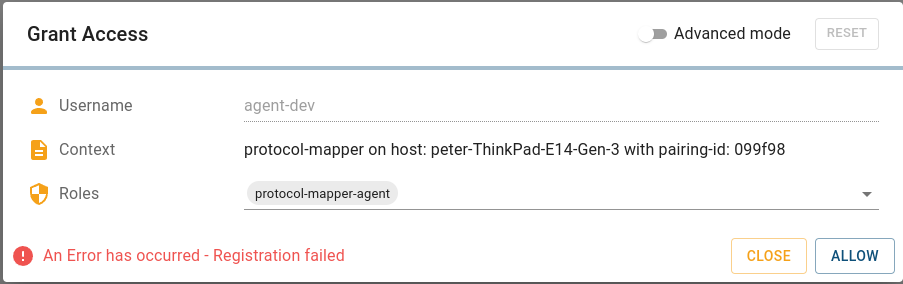 auth-server logs show: Unable to process request: 'POST /api/client-registry/confirm', because: Certificate Common Name does not match the username. CN: someCN, username: agentName | Certificate invalid | Verify the certificate’s Common Name (CN) is identical to the name you configured in the Helm value name for this agent. |
| Agent with mTLS enabled does not connect to broker Agent log shows Can not register protocol-mapper agent, because: socket hang up | Certificate invalid | Verify the agent’s certificate was signed by the correct Certificate Authority (CA). |
| Agent with mTLS enabled does not connect to broker Agent log shows Failed to register agent. Response: 409 Conflict. A conflicting registration might be pending, or a user with the same username <agent-name> is already existing (which you must delete first). | The username of this agent is already taken | Every agent needs a user with the username of the value configured in the Helm value name for this agent. Verify that the agent’s name is unique Verify there is no old agent with the same name, if there is: – Delete the Agent using the Systems => Agents UI – Delete the user using the User Management => Users and Roles UI If you created a user with the agent’s name for something else you have to choose a different name for the agent |
| Agent pod enters state CrashLoopBackOff Agent log shows: {"level":30,"time":1670940068658,"pid":8,"hostname":"welder-robots-0","service":"protocol-mapper","msg":"Re-starting using cached credentials"} | The agents credentials are not correct anymore | The agent needs to be re-registered: Delete the Agent using the Systems => Agents UI Delete the user using the User Management => Users and Roles UI Delete the agents StatefulSet: kubectl -n <namespace> delete sts <agent-name>Delete the agents PersistentVolumeClaim: kubectl -n <namespace> delete pvc protocol-mapper-<agent-name>-0Re-apply your configuration through helm upgrade as described in Applying Helm configuration changes. |
Important: Connectware currently does not support hit-less upgrades. You may experience a service degradation during upgrading. Make sure to take an appropriate maintenance window into account when upgrading.
Before upgrading Connectware, make sure that you meet the following prerequisites:
Make sure that you know the exact version number of the Connectware version that you want to upgrade to.
For the code examples in this documentation, we use the variable <target-version> to refer to the Connectware version that you want to upgrade to.
You must update the Helm repository cache to make sure that you receive the latest Connectware version.
helm repo updateBefore you upgrade to a new Connectware version, we recommend that you read the changelog to find out about new features, bug fixes, and changes of the Connectware version that you want to upgrade to.
Before you upgrade to a new Connectware version, read the readme file of the Connectware version that you want to upgrade to for additional upgrade instructions.
helm show readme <repo-name>/connectware --version <target-version></code></code>
Code-Sprache: YAML (yaml)With a new Connectware version, there might be changes to the default Helm configuration values. We recommend that you compare the default Helms values of your current Connectware version with the default Helm values of your target Connectware version.
helm show values <repo-name>/connectware --version <target-version>
Code-Sprache: YAML (yaml)diff <(helm show values <repo-name>/connectware --version <current-version>) <(helm show values <repo-name>/connectware --version <target-version>
Code-Sprache: YAML (yaml)Example
diff <(helm show values cybus/connectware --version 1.1.0) <(helm show values cybus/connectware --version 1.1.1)
83c83
<     version: 1.1.0
---
>     version: 1.1.1
Code-Sprache: YAML (yaml)
In this example, only the image version has changed. However, if any of the Helm value changes are relevant to your setup, make the appropriate changes.
When you have reviewed the necessary information, adjust your configuration in your <values.yaml> file. Not every upgrade requires adjustments.
If you specified which image version of Connectware to use by setting the Helm value global.image.version you will need to update this to <target-version>. Unless you have a specific reason to use a specific image version, we recommend not setting the Helm value.
Make sure that you store backups of your setup. This allows you to restore a previous state if necessary.
Your backups must consist of the following files:
Depending on your local infrastructure, it may be necessary to back up additional files.
Once you have all the information that you need to upgrade your Connectware, you can start the upgrade process. The following sections will guide you through monitoring the upgrade, as well as what to do on failed upgrades.
helm upgrade -n <namespace> <installation-name> <repo-name>/connectware --version <target-version> -f <values.yaml>
Code-Sprache: YAML (yaml)
Optionally you can use the --atomic --timeout 10m command line switch, which will cause Helm to wait for the result of your upgrade and perform a rollback when it fails. We recommend setting the timeout value to at least 10 minutes, but because the time it takes to complete an upgrade strongly depends on your infrastructure and configuration you might have to increase it further.
Result: The newly generated workload definitions are applied to your Kubernetes cluster and your Connectware pods are replaced.
You can monitor the Connectware upgrade progress to verify that everything runs smoothly, to know when the installation is successful, or to investigate potential issues.
The Connectware upgrade can take a few minutes. To monitor the upgrade process, do one of the following:
kubectl get pods -n <namespace>
Code-Sprache: YAML (yaml)while [ True ]; do clear; kubectl get pod -n <namespace>; sleep 5; done
Code-Sprache: YAML (yaml)During the Connectware upgrade, the pods go through the following stages:
When pods reach the STATUS Running, they go through their individual startup before reporting as Ready. To be fully functional, all pods must reach the STATUS Running and report all their containers as ready. This is indicated by them showing the same number on both sides of the / in the column READY.
Example
$ kubectl get pod -n <namespace>
Code-Sprache: YAML (yaml)| NAME | READY | STATUS | RESTARTS | AGE |
|---|---|---|---|---|
| admin-web-app-7cd8ccfbc5-bvnzx | 1/1 | Running | 0 | 3h44m |
| auth-server-5b8c899958-f9nl4 | 1/1 | Running | 0 | 3m3s |
| broker-0 | 1/1 | Running | 0 | 3h44m |
| broker-1 | 1/1 | Running | 0 | 2m1s |
| connectware-7784b5f4c5-g8krn | 1/1 | Running | 0 | 21s |
| container-manager-558d9c4cbf-m82bz | 1/1 | Running | 0 | 3h44m |
| doc-server-55c77d4d4c-nwq5f | 1/1 | Running | 0 | 3h44m |
| ingress-controller-6bcf66495c-l5dpk | 1/1 | Running | 0 | 18s |
| postgresql-0 | 1/1 | Running | 0 | 3h44m |
| protocol-mapper-67cfc6c848-qqtx9 | 1/1 | Running | 0 | 3h44m |
| service-manager-f68ccb767-cftps | 1/1 | Running | 0 | 3h44m |
| system-control-server-58f47c69bf-plzt5 | 1/1 | Running | 0 | 3h44m |
| workbench-5c69654659-qwhgc | 1/1 | Running | 0 | 15s |
At this point Connectware is upgraded and started. You can now make additional configurations or verify the upgrade status in the Connectware Admin UI.
For more information on the Connectware Admin UI, see the Connectware documentation.
If a pod is in another state than expected or if it is stuck at a certain stage for more than three minutes, there might be an issue.
kubectl describe pod <pod-name>
Code-Sprache: YAML (yaml)
For help on solving issues, see Troubleshooting Connectware on Kubernetes.
If the Helm upgrade fails, and it is not possible to immediately identify and fix the problem, you can roll back Helm upgrades using the helm rollback command.
To perform the rollback you need to know the current REVISION of your installation. Use the command helm list -n <namespace>, and note down the value for REVISION displayed in the row of your Connectware installation. In the next section you will use this value and decrement one to restore the previous REVISION. For example, if the REVISION displayed is 8, you will use 7 in the helm rollback command:
helm rollback --wait -n <namespace> <installation-name> <REVISION - 1>
Code-Sprache: YAML (yaml)
Note: This will roll back your Helm upgrade and start your previous version of Connectware. It is possible that you will need to perform a restore of Connectware, if there were modifications made by the attempted upgrade
When you have chosen whether to use Connectware LTS or regular you are ready to install in your target cluster.
To install Connectware on Kubernetes, you must complete the following tasks:
Before you start with the Connectware installation, make sure that you meet the following prerequisites:
To use the Connectware Helm chart, add the Connectware Helm chart repository.
Example
helm repo add <local-repo> https://repository.cybus.io/repository/connectware-helm
Code-Sprache: YAML (yaml)The values.yaml file is the configuration file for an application that is deployed through Helm. The values.yaml file allows you to configure your Connectware installation. For example, edit deployment parameters, manage resources, and update your Connectware to a new version.
In this documentation, we will focus on a basic Kubernetes configuration and commonly used parameters.
Note: We recommend that you store the values.yaml file in a version control system.
A Helm chart contains a default configuration. It is likely that you only need to customize some of the configuration parameters. We recommend that you create a copy of the default values.yaml file named default-values.yaml and a new, empty values.yaml file to customize specific parameters.
Example
helm show values cybus/connectware > default-values.yaml
Code-Sprache: YAML (yaml)When you have created the default-values.yaml file, you can create the values.yaml file to add your custom configuration parameters.
Example
vi values.yaml
Code-Sprache: YAML (yaml)To install Connectware, you need a valid license key.
global.licenseKey.Example
global:
  licensekey: cY9HiVZJs8aJHG1NVOiAcrqC_ # example value
Code-Sprache: YAML (yaml)You must specify a secret for the broker cluster. The cluster secret value is used to secure your broker cluster, just like a password.
Important: Treat the broker cluster secret with the same level of care as a password.
global.broker.clusterSecret.Example
global:
  licensekey: cY9HiVZJs8aJHG1NVOiAcrqC_ # example value
  broker:
    clusterSecret: Uhoo:RahShie6goh # example value
Code-Sprache: YAML (yaml)For a fresh Connectware installation, we recommend that you set best-practice labels on immutable workload objects like StatefulSet volumes.
global.setImmutableLabels to true.Example
global:
  licensekey: cY9HiVZJs8aJHG1NVOiAcrqC_ # example value
  broker:
    clusterSecret: Uhoo:RahShie6goh # example value
  setImmutableLabels: true
Code-Sprache: YAML (yaml)By default, Connectware uses three nodes for the broker cluster that moves data. You can specify a custom number of broker nodes. For example, increase the broker nodes to handle higher data loads or decrease the broker nodes for a testing environment.
global.broker.replicaCount.Example
global:
  licensekey: cY9HiVZJs8aJHG1NVOiAcrqC_ # example value
  broker:
    clusterSecret: Uhoo:RahShie6goh # example value
    replicaCount: 5
  setImmutableLabels: true
    clusterSecret: ahciaruighai_t2G # example value
Code-Sprache: YAML (yaml)By default, Connectware uses the same broker for data payload processing and control-plane communication. You can use a separate control-plane broker. This might be useful for production environments, as it provides higher resilience and better manageability in cases of the data broker becomes slow to respond due to high load.
global.controlPlaneBroker.enabled to true.global.controlPlaneBroker.clusterSecret.Important: Treat the broker cluster secret with the same level of care as a password.
Example
global:
  licensekey: cY9HiVZJs8aJHG1NVOiAcrqC_ # example value
  broker:
    clusterSecret: Uhoo:RahShie6goh # example value
  setImmutableLabels: true
  controlPlaneBroker:
    enabled: true
    clusterSecret: ahciaruighai_t2G # example value
Code-Sprache: YAML (yaml)Tip: You can activate/deactivate this option within a scheduled maintenance window.
A broker cluster can contain several Kubernetes StorageClasses. You can specify which StorageClass Connectware should use.
global.storage.storageClassName.Example
global:
  licensekey: cY9HiVZJs8aJHG1NVOiAcrqC_ # example value
  broker:
    clusterSecret: Uhoo:RahShie6goh # example value
  setImmutableLabels: true
  storage:
    storageClassName: gp2 # example value
Code-Sprache: YAML (yaml)
There are several configuration parameters to control the StorageClass of each volume that Connectware uses.
By default, Connectware is configured for high-performance systems and according to the guaranteed Quality of Service (QoS) class. However, you can use the Kubernetes resource management values requests and limits to specify the CPU and memory resources that Connectware is allowed to use.
Important: Adjusting CPU and memory resources can impact the performance and availability of Connectware. When you customize the settings for CPU and memory resources, make sure that you monitor the performance and make adjustments if necessary.
Example
global:
  licensekey: cY9HiVZJs8aJHG1NVOiAcrqC_ # example value
  broker:
    clusterSecret: Uhoo:RahShie6goh # example value
  setImmutableLabels: true
  podResources:
    distributedProtocolMapper:
      limits:
        cpu: 2000m
        memory: 3000Mi
      requests:
        cpu: 1500m
        memory: 1500Mi
Code-Sprache: YAML (yaml)
Related links
When you are done customizing your installation through your Helm values, you can deploy Connectware onto your Kubernetes cluster.
helm installconnectware.cybus.Example
helm install <installation-name> cybus/connectware -f ./values.yaml -n <namespace> --create-namespace
Code-Sprache: YAML (yaml)
This deploys Connectware according to your kubectl configuration.
You can monitor the Connectware installation progress to verify that everything runs smoothly, to know when the installation is successful, or to investigate potential issues.
The Connectware installation can take a few minutes. To monitor the installation process, do one of the following:
kubectl get pods -n <namespace>
Code-Sprache: YAML (yaml)while [ True ]; do clear; kubectl get pod -n <namespace>; sleep 5; done
Code-Sprache: YAML (yaml)During the Connectware installation, the pods go through the following stages:
When pods reach the STATUS Running, they go through their individual startup before reporting as Ready. To be fully functional, all pods must reach the STATUS Running and report all their containers as ready. This is indicated by them showing the same number on both sides of the / in the column READY.
Example
$ kubectl get pod -n <namespace>
Code-Sprache: YAML (yaml)| NAME | READY | STATUS | RESTARTS | AGE |
|---|---|---|---|---|
| admin-web-app-7cd8ccfbc5-bvnzx | 1/1 | Running | 0 | 3h44m |
| auth-server-5b8c899958-f9nl4 | 1/1 | Running | 0 | 3m3s |
| broker-0 | 1/1 | Running | 0 | 3h44m |
| broker-1 | 1/1 | Running | 0 | 2m1s |
| connectware-7784b5f4c5-g8krn | 1/1 | Running | 0 | 21s |
| container-manager-558d9c4cbf-m82bz | 1/1 | Running | 0 | 3h44m |
| doc-server-55c77d4d4c-nwq5f | 1/1 | Running | 0 | 3h44m |
| ingress-controller-6bcf66495c-l5dpk | 1/1 | Running | 0 | 18s |
| postgresql-0 | 1/1 | Running | 0 | 3h44m |
| protocol-mapper-67cfc6c848-qqtx9 | 1/1 | Running | 0 | 3h44m |
| service-manager-f68ccb767-cftps | 1/1 | Running | 0 | 3h44m |
| system-control-server-58f47c69bf-plzt5 | 1/1 | Running | 0 | 3h44m |
| workbench-5c69654659-qwhgc | 1/1 | Running | 0 | 15s |
At this point Connectware is installed and started. You can now make additional configurations or verify the installation status in the Connectware Admin UI.
For more information on the Connectware Admin UI, see the Connectware documentation.
If a pod is in another state than expected or if it is stuck at a certain stage for more than three minutes, there might be an issue.
kubectl describe pod <pod-name>
Code-Sprache: YAML (yaml)
For help on solving issues, see Troubleshooting Connectware on Kubernetes.
The local name of your Connectware Helm repository corresponds to the following URL: https://repository.cybus.io/repository/connectware-helm
For the code examples in this documentation, we use the variable <local-repo> to refer to the local name of your Connectware Helm repository.
If you want to upgrade and configure Connectware, you must know the name, namespace, and version of your Connectware installation.
Prerequisites
Procedure
helm list -AResult
The name, namespace, and version number of your Connectware installation is displayed in the NAME, NAMESPACE, and APP VERSION columns. If you have trouble locating your Connectware installation in the list, look for connectware in the CHART column.
| NAME | NAMESPACE | revision | updated | status | chart | app VERSION |
|---|---|---|---|---|---|---|
| connectware | connectware | 4 | 2022-12-01 17:04:16.664663648 +0100 CET | deployed | connectware-1.1.0 | 1.1.0 |
For the code examples in this documentation, we use the following variables:
<installation-name><namespace><current-version>The Helm configuration that Connectware uses is stored in the values.yaml file. You can extract the values.yaml file from your installation.
Prerequisites
Procedure
helm get values <installation-name> -n <namespace> -o yaml > values.yaml
Code-Sprache: YAML (yaml)
For the code examples in this documentation, we use the variable <values.yaml> to refer to the currently used Helm values.
Related links
When you have changed the Helm configuration in your values.yaml file, you must apply the changes via an Helm upgrade.
Important: When you apply the changes that you have made to the values.yaml file, the former configuration is overwritten. We recommend that you apply configuration changes during planned maintenance times.
Prerequisites
Procedure
helm upgrade -n <namespace> <installation-name> -f values.yaml
Code-Sprache: YAML (yaml)kubernetes.io/dockerconfigjson secret providing access to the Cybus image registry (see text for details).kubectl installed (Install Tools).kubectl configured with the current context pointing to your target cluster (Configure Access to Multiple Clusters).Follow this guide if you want to install agents using the connectware-agent Helm chart without providing your license key.
You have two options to achieve this:
The agents will still verify a valid license for your Connectware once you register them
If you don’t enter a license key, you can still install the agent if you provide an already existing Kubernetes secret of type kubernetes.io/dockerconfigjson.
Connectware creates a secret like this named cybus-docker-registry. If you install agents in the same namespace as Connectware itself, you can simply use this secret by listing it in the protocolMapperAgentDefaults.image.pullSecrets list of your values.yaml file:
# not needed when supplying another pullSecret
# licenseKey:
protocolMapperAgentDefaults:
  image:
    pullSecrets:
      - name: cybus-docker-registry
Code-Sprache: YAML (yaml)
If your Connectware installation is in a different namespace, you can copy the secret from your Connectware namespace to the target namespace by using this command:
kubectl get secret cybus-docker-registry --namespace=<connectware-namespace> -o yaml | sed 's/namespace: .*/namespace: <agent-namespace>/' | kubectl apply -f -
Code-Sprache: YAML (yaml)
Example
kubectl get secret cybus-docker-registry --namespace=connectware -o yaml | sed 's/namespace: .*/namespace: connectware-agent/' | kubectl apply -f -
Code-Sprache: YAML (yaml)
If you need to copy between Kubernetes clusters, you can use the --context parameter of kubectl to target your local contexts.
Of course you can also use a completely manually created secret, as long as it provides access to the registry used to pull the agents protocol-mapper image.
You can also use a custom registry to provide the protocol-mapper image for the agent.
In this case, set this registry in the image.registry inside the protocolMapperAgentDefaults section in your values.yaml file.
Example
# not needed when supplying another image registry
# licenseKey:
protocolMapperAgentDefaults:
  image:
    registry: registry.company.tld/cybus
Code-Sprache: YAML (yaml)
If your custom registry requires authentication, you must also provide a manually created kubernetes.io/dockerconfigjson secret in the protocolMapperAgentDefaults.image.pullSecrets list of your values.yaml file.
Example
# not needed when supplying another image registry
# licenseKey:
protocolMapperAgentDefaults:
  image:
    registry: registry.company.tld/cybus
    pullSecrets:
      - name: my-company-pull-secret
Code-Sprache: YAML (yaml)
Hint: kubernetes.io/dockerconfigjson secrets can be created with this command:
kubectl create secret <secret-name> --docker-server=<registry-address> --docker-username=<username> --docker-password=<password> --docker-email=<user-email>
Code-Sprache: YAML (yaml)Sie müssen den Inhalt von reCAPTCHA laden, um das Formular abzuschicken. Bitte beachten Sie, dass dabei Daten mit Drittanbietern ausgetauscht werden.
Mehr InformationenSie sehen gerade einen Platzhalterinhalt von Turnstile. Um auf den eigentlichen Inhalt zuzugreifen, klicken Sie auf die Schaltfläche unten. Bitte beachten Sie, dass dabei Daten an Drittanbieter weitergegeben werden.
Mehr InformationenSie sehen gerade einen Platzhalterinhalt von Facebook. Um auf den eigentlichen Inhalt zuzugreifen, klicken Sie auf die Schaltfläche unten. Bitte beachten Sie, dass dabei Daten an Drittanbieter weitergegeben werden.
Mehr InformationenSie sehen gerade einen Platzhalterinhalt von HubSpot. Um auf den eigentlichen Inhalt zuzugreifen, klicken Sie auf die Schaltfläche unten. Bitte beachten Sie, dass dabei Daten an Drittanbieter weitergegeben werden.
Mehr InformationenSie sehen gerade einen Platzhalterinhalt von Hubspot Meetings. Um auf den eigentlichen Inhalt zuzugreifen, klicken Sie auf die Schaltfläche unten. Bitte beachten Sie, dass dabei Daten an Drittanbieter weitergegeben werden.
Mehr InformationenSie sehen gerade einen Platzhalterinhalt von Instagram. Um auf den eigentlichen Inhalt zuzugreifen, klicken Sie auf die Schaltfläche unten. Bitte beachten Sie, dass dabei Daten an Drittanbieter weitergegeben werden.
Mehr InformationenSie sehen gerade einen Platzhalterinhalt von X. Um auf den eigentlichen Inhalt zuzugreifen, klicken Sie auf die Schaltfläche unten. Bitte beachten Sie, dass dabei Daten an Drittanbieter weitergegeben werden.
Mehr Informationen

