Installing Cybus Connectware
Introduction
In this lesson you will learn how to install Cybus Connectware directly onto a Linux system. The following topics are covered by this article:
- Acquiring a license
- Installing Cybus Connectware
- Updating Cybus Connectware
- Changing SSL certificates
- Removing Connectware
Prerequisites for Installing Cybus Connectware
This lesson assumes that you already have an account for the Cybus Portal. If you have no valid credentials, please contact our sales team.
If you want to refresh your knowledge of Docker before starting this lesson see Docker Basics Lesson.
Docker and Docker Compose must also be installed and running on your host. During the installation an internet connection is required to download Docker images fromregistry.cybus.io.
If Docker is not installed, start here:
If Docker Compose is not installed, then see here https://docs.docker.com/compose/install/
Acquire your License Key
During the installation you will be asked to enter your Connectware license key. Follow these steps to obtain your license key.
- Go to the Cybus Portal and enter your Username and Password.
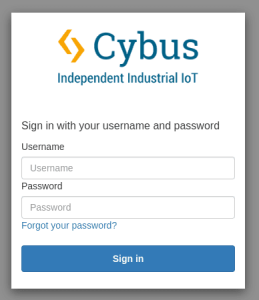
- Select Licenses from the menu. This will take you to an overview of all Connectware licenses currently available to you.

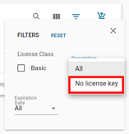
- Select the license you want to use to install Connectware by clicking on that license. Preferably, select the one whose description specifies No license key created yet. Furthermore, you can apply a filter and select No license key in the description.
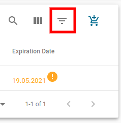

- Click Download License Key in the upper right corner.

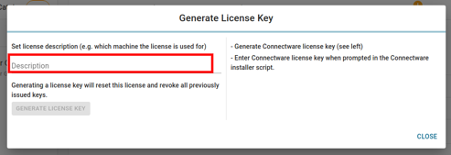
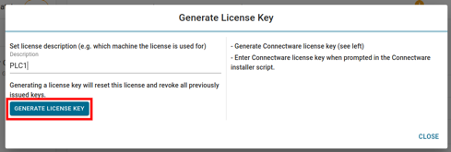
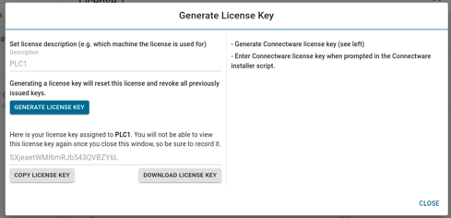
- You can now generate a license key by setting a description for the license and clicking on Generate License Key. The generated license key will be displayed and can be copied to the clipboard for later use. Please make sure to keep the license key as it cannot be viewed after closing the window. If the key is lost you have to repeat this step to create a new license key for the selected appliance, which invalidates any old and, under circumstances, already deployed license key. You are now prepared for the installation.
Installing Cybus Connectware
Installing Connectware is made easy using the prebuilt installer script provided by Cybus. To download and use the script follow the steps below.
Prepare Installer Script
- Download the installer script for the desired version of Connectware on your host system. This can be found at
download.cybus.io/<VERSION>/connectware-online-installer.sh. In the example below we will use the latest version of Connectware.
$ wget -O ./connectware-online-installer.sh https://download.cybus.io/latest/connectware-online-installer.sh
Code-Sprache: YAML (yaml)- Optional: It is a security risk to run bash scripts downloaded directly from the web. So feel free to open the installer script and check its contents.
$ cat connectware-online-installer.sh
Code-Sprache: YAML (yaml)- We now need to make the script executable so it can be run as a script.
$ chmod +x ./connectware-online-installer.sh
Code-Sprache: YAML (yaml)
The installer script is now ready to be run.
First Time Installation
- Run installer script. Please note the installer script does not need sudo privileges to run unless you want to run Connectware as a systemd service (recommended) or install directory requires additional permissions. In this example we will be installing Connectware as a systemd service so we will run it with sudo.
$ sudo ./connectware-online-installer.sh
Code-Sprache: YAML (yaml)- The version of Connectware will be printed with a greeting Please confirm that the version is correct and press enter.
- You will now be asked for your desired target directory for installation. In this example we will press enter to go with the default path:
/opt/connectware - The installer script will then run preflight checks to make sure that all system requirements are met. If they are not then please check the prerequisites section at the beginning of this lesson.
If all requirements are met then you should see the following output.
Running preflight checks.
=========================
Validating write permission to installation location /opt/connectware: [OK]
Checking whether this system has systemd: [YES]
Validating required utility installation: [OK]
Validating Cybus docker-registry connection: [OK]
Validating Docker installation: [OK]
Validating Docker Compose installation: [OK]
Validating that no former Connectware is running: [OK]
Preflight checks finished successfully!
Code-Sprache: YAML (yaml)- You will now be prompted for your Cybus license key. If your credentials are valid then you should see the following output.
Verifying license key...
Login succeeded.
Code-Sprache: YAML (yaml)- You will now be asked whether you would like to boot Connectware as a system-service. Without this, the application must be started by hand every time the host system starts. In this example we will press enter to confirm yes.
- The installer script will then print your chosen options and ask for confirmation that they are correct.
If you followed this example then you should see the following.
Please review and confirm the following Connectware configuration:
------------------------------------------------------------------

Connectware license key:       [VALID]
Installation directory:       /opt/connectware
Autostart as systemd service: true

Accept configuration? [Y/n]
Code-Sprache: YAML (yaml)- The Connectware container images will then pulled onto your system. After they are successfully pulled, the installer script will check for old container images of previous Connectware versions, which can safely be removed („pruned“) to clean up disk space. The installer will ask for confirmation before any container images are removed. In this example the question looks as follows.
-----------------------------------------
Removing old Docker images
-----------------------------------------

The following Docker images are from previous Connectware versions and can be removed:

REPOSITORY                            TAG          IMAGE ID  CREATED      SIZE
registry.cybus.io/cybus/admin-web-app ***********  e561383a5 24 hours ago 21.5MB
REPOSITORY                            TAG          IMAGE ID  CREATED      SIZE
registry.cybus.io/cybus/auth-server   ***********  a65b7f32f 24 hours ago 165MB
REPOSITORY                            TAG          IMAGE ID  CREATED      SIZE
registry.cybus.io/cybus/broker        ***********  80dd0fb24 24 hours ago 56.7MB
(...)

-----------------------------------------

Should the above docker images be removed from your local computer (pruned)? [Y/n]
Code-Sprache: YAML (yaml)- After confirming your choice, you can observe the result of the image removal operation. As the last step, the installer will print a message telling you Connectware has been started or which commands you need to enter to run or stop Connectware.
In our example you should be prompted with the following.
Successfully installed Connectware!
===================================
You can find the installation directory at /opt/connectware.
In order to stop type:
systemctl stop connectware
Code-Sprache: YAML (yaml)
Running the Installation in Silent Mode
Running the installer with the -s or --silent flag will start the installation in an automated mode without the need of user interaction.
To use this way of deploying Connectware the license key has to be supplied using the --license-key flag.
This deploys Connectware in a minimal configuration to the default /opt/connectware directory without installing the systemd service.
You can further personalize your installation using the supported installation flags. To see a full list of options just run the installation script with the --help flag.
Updating from an Older Version
To perform an update of an existing Connectware installation is just as easy as installing a new one.
All you need to do is to obtain the new installer script by following the same steps as described in the chapters Prepare Installer Script.
To upgrade an existing installation just choose the same folder your Connectware is currently running in.
All your custom settings like license key or network settings will automatically be migrated.
If you are asked for your license key during the update, you might have specified a wrong installation directory. If this is the case, please cancel the update and ensure you choose the correct installation path.
Remember that if your existing Connectware used elevated privileges during installation to also run the update using sudo.
Updating in Silent Mode
The easiest way to update to a newer version is to run the update in silent mode. All you have to do is to start the installer script using the silent -s and directory -d flags.
$ ./connectware-online-installer.sh -s -d <PATH/TO/YOUR/CONNECTWARE/FOLDER>
Code-Sprache: YAML (yaml)
Changing SSL Certificates
In case you need to update or change the certificate files (for example if you renewed them using certbot with Let’s Encrypt or want to add a self-signed certificate) you can do this by copying them to Connectware:
$ docker cp -L <path-to/your-key-file.key> <your-connectware-container>:/connectware_certs/cybus_server.key
$ docker cp -L <path-to/your-cert-file.crt> <your-connectware-container>:/connectware_certs/cybus_server.crtCode-Sprache: YAML (yaml)
The name of your Connectware container depends on the directory it was installed to and is rendered as <your-connectware-directory>_connectware_1. By default Connectware is installed to /opt/connectware/ which results in the container name connectware_connectware_1.
Restart the Connectware proxy to apply the changed files.
$ docker restart <your-connectware-container>
Code-Sprache: YAML (yaml)
Removing Connectware
Removing Connectware from your system is a manual process. Follow the steps below in your terminal to remove Connectware.
- Stop the running Connectware instance. If Connectware systemd service has been installed simply run the command
systemctl stop connectware. Otherwise change into your installation directory and manually stop the running instance withdocker-compose down. - Optional: Remove the systemd service. If the systemd service was deployed it has to be stopped and disabled before it can be removed:
$ systemctl stop connectware
$ systemctl disable connectware
$ rm /etc/systemd/system/connectware.service
Code-Sprache: YAML (yaml)- Remove the installation directory. Now that Connectware has been stopped you can remove all local files contained in your installation directory.
$ rm -rf /opt/connectware
Code-Sprache: YAML (yaml)- Clean docker artifacts. The final step is to remove all remaining docker artifacts that are still on your system.
List all images, containers, volumes and networks:
$ docker images -a
$ docker container ls -a
$ docker volume ls
$ docker network ls
Code-Sprache: YAML (yaml)
To remove a specific container:
$ docker container rm <CONTAINER-NAME>
Code-Sprache: YAML (yaml)
Remove a specific image:
$ docker image rm <IMAGE-NAME>
Code-Sprache: YAML (yaml)
For removing a specific volume:
$ docker volume rm <VOLUME-NAME>Remove a specific network:
$ docker network rm <NETWORK-NAME>
Code-Sprache: YAML (yaml)
If you have no docker applications other then Connectware running on your system you can also simply remove all artifacts by running
$ docker system prune -a -f
Code-Sprache: YAML (yaml)
Please keep in mind that this will remove all currently unused docker resources not only those created by Connectware.
Using Connectware
After following all the steps above, Connectware is now installed. You can access the Admin UI by opening your browser and entering the host’s IP address directly: https://<HOST-IP>.
The initial login credentials are
Username: admin
Password: admin
If you would like to learn more how to use Connectware, check out our docs at https://docs.cybus.io/ or see more guides here.
Need more help?
Can’t find the answer you’re looking for?
Don’t worry, we’re here to help.
