Docker Container Monitoring Using PRTG
Prerequisites
In this lesson we will walk you through all the measures necessary to be taken so PRTG is able to connect to a remote Docker socket.
As a prerequisite, it is necessary to have Docker installed on your system as well as an instance of PRTG with access to that host.
We assume you have at least a basic understanding of Docker and Linux. If you want to refresh your knowledge, we recommend looking at the lesson Docker Basics.
Explaining Linux would be far out of scope for this lesson, but it’s likely an answer to any Linux related question is out there on the internet. Anyway, if you read carefully, the listed commands should work with only minor adjustments.
Introduction
Monitoring your IT infrastructure has a lot of benefits, discovering bottlenecks and gaining insights for predictive measures being only the tip of the iceberg.
PRTG is a solid monitoring solution already present and actively used in a lot of IT departments. Because there are a lot of different monitoring solutions out there, this article is targeted to be compatible with the way PRTG handles Docker Container Monitoring.
PRTG requires the Docker Socket to be exposed to the network, which is not the case on a default setup. The reason for the port not being exposed by default is because of security reasons.
An exposed and unsecured port could lead to a major security issue! Whoever is able to connect to the docker socket could easily gain full control on the system – meaning root access.
Therefore it is really important to handle these configurations with care. The measurement we are going to take is to secure the remote access by using TLS certificates. You can read more about this in the Docker docs.
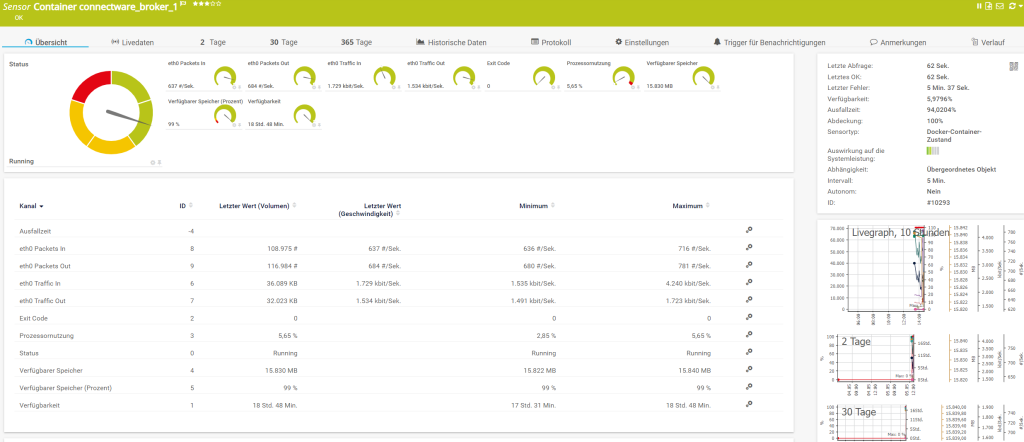
A guide on the PRTG Docker Container Sensor can be found here.
Certificate Generation
First of all we need to create a bunch of certificates. There are basically two options for doing this.
- The first being to use your private company certificate authority.
- The second is to create the certificates locally.
We are going to use the second option, which means all certificates are going to be self-signed, but that’s totally fine for the purpose of this lesson.
All instructions for the creation of the certificates can be found in the docker docs. To simplify this a little bit, we created a small script that executes all the commands for you.
All the steps below assume you are going to use the script. The script is non-interactive, meaning you do not have to enter anything during execution. The generated certificates won’t be password protected and are valid for 50 years.
Create a directory called .docker in your home directory. This directory is the default directory where the Docker CLI stores all its information.
$ mkdir -p ~/.docker
Code-Sprache: YAML (yaml)
Clone the script into the previously created directory.
$ git clone https://gist.github.com/6f6b9a85e136b37cd52983cb88596158.git ~/.docker/
Code-Sprache: YAML (yaml)
Change into the directory.
$ cd ~/.docker/
Code-Sprache: YAML (yaml)
Make the script executable.
$ chmod +x genCerts.sh
Code-Sprache: YAML (yaml)
Then we need to adjust a few things within the script.
$ nano genCerts.sh
Code-Sprache: YAML (yaml)
Adjust the HOST to match your hostname and the last IP of the HOSTS string to match your host ip address.
This is how it looks for my setup.
HOST="cybus.io"
HOSTS="DNS:$HOST,IP:127.0.0.1,IP:172.16.0.131"
Code-Sprache: YAML (yaml)
Now we are ready to execute the script.
$ sh genCerts.sh
Code-Sprache: YAML (yaml)
The output should be somewhat like this.
# Start

# Generate CA private and public keys
Generating RSA private key, 4096 bit long modulus (2 primes)
.................................................................................................................................................................................................................................................................................................................................................................................................................................................................................................++++
...............++++
e is 65537 (0x010001)

Create a server key
Generating RSA private key, 4096 bit long modulus (2 primes)
.++++
..........................................................................++++
e is 65537 (0x010001)

Create certificate signing request

Sign the public key with CA
Signature ok
subject=CN = cybus.io
Getting CA Private Key

Create a client key and certificate signing request
Generating RSA private key, 4096 bit long modulus (2 primes)
.................................................................................................................................++++
...............................................................................................................................................................................................................................................................................................................++++
e is 65537 (0x010001)

Make the key suitable for client authentication

Generate the signed certificate
Signature ok
subject=CN = client
Getting CA Private Key

Remove the two certificate signing requests and extensions config
removed 'client.csr'
removed 'server.csr'
removed 'extfile.cnf'
removed 'extfile-client.cnf'
Code-Sprache: YAML (yaml)
To verify all certificates have been generated successfully we inspect the content of the directory.
$ ls
Code-Sprache: YAML (yaml)
These files should be present. If there are more files than this, that’s no issue.
ca-key.pem  ca.pem  ca.srl  cert.pem  genCerts.sh  key.pem  server-cert.pem  server-key.pem
Code-Sprache: YAML (yaml)
The last step is to locate the full path to where the certificates live.
$ pwd
Code-Sprache: YAML (yaml)
This is the output in my case. Yours will look a little bit different.
/home/jan/.docker
Code-Sprache: YAML (yaml)
Docker Service Configuration
With all the necessary certificates in place, we have to assign them to the docker daemon. We can find the location of the configuration file by checking the status of the docker service.
$ sudo systemctl status docker.service
Code-Sprache: YAML (yaml)
As stated in the output, the configuration file is located at /lib/systemd/system/docker.service
● docker.service - Docker Application Container Engine
       Loaded: loaded (/lib/systemd/system/docker.service; enabled; vendor preset: enabled)
       Active: active (running) since Mon 2022-05-02 10:26:56 EDT; 33s ago
  TriggeredBy: ● docker.socket
       Docs: https://docs.docker.com   Main PID: 468 (dockerd)
        Tasks: 9
       Memory: 109.2M
          CPU: 307ms     CGroup: /system.slice/docker.service
               └─468 /usr/bin/dockerd -H fd:// --containerd=/run/containerd/containerd.sock
Code-Sprache: YAML (yaml)
To adjust the configuration to our needs, we are going to open the configuration using sudo privileges.
$ sudo nano /lib/systemd/system/docker.service
Code-Sprache: YAML (yaml)
Find the line starting with ExecStart=/usr/bin/dockerd -H fd:// and add the following content to it. Be sure to use the correct path for your setup.
-H tcp://0.0.0.0:2376 --tlsverify=true --tlscacert=/home/jan/.docker/ca.pem --tlscert=/home/jan/.docker/server-cert.pem --tlskey=/home/jan/.docker/server-key.pem
Code-Sprache: YAML (yaml)
For me the complete line looks like this.
ExecStart=/usr/bin/dockerd -H fd:// -H tcp://0.0.0.0:2376 --tlsverify=true --tlscacert=/home/jan/.docker/ca.pem --tlscert=/home/jan/.docker/server-cert.pem --tlskey=/home/jan/.docker/server-key.pem --containerd=/run/containerd/containerd.sock
Code-Sprache: YAML (yaml)
Flush the changes and restart the docker service.
$ sudo systemctl daemon-reload
$ sudo systemctl restart docker
Code-Sprache: YAML (yaml)
Now we can verify our changes did take effect.
$ sudo systemctl status docker.service
Code-Sprache: YAML (yaml)
● docker.service - Docker Application Container Engine
Loaded: loaded (/lib/systemd/system/docker.service; enabled; vendor preset: enabled)
Active: active (running) since Tue 2022-05-03 04:56:12 EDT; 2min 32s ago
TriggeredBy: ● docker.socket
Docs: https://docs.docker.com
Main PID: 678 (dockerd)
Tasks: 9
Memory: 40.8M
CPU: 236ms
CGroup: /system.slice/docker.service
└─678 /usr/bin/dockerd -H fd:// -H tcp://0.0.0.0:2376 --tlsverify=true --tlscacert=/home/jan/.docker/ca.pem --tlscert=/home/jan/.docker/server-cert.pem --tlskey=/home/jan/.docker/server-key.pem --containerd=/run/containerd/containerd.sock
Code-Sprache: YAML (yaml)Now we can use the Docker CLI to connect to the Docker Daemon using the specified port. The important part is to use –tlsverify=true as this tells the Docker CLI to use the generated certificates located in our home directory ( ~/.docker).
Remember to adjust the IP address in the second line with your individual one.
$ docker -H 127.0.0.1:2376 --tlsverify=true version
$ docker -H 172.16.0.131:2376 --tlsverify=true version
Code-Sprache: YAML (yaml)
This is the output of both commands on my system.
Client: Docker Engine - Community
Version:           20.10.14
API version:       1.41
Go version:        go1.16.15
Git commit:        a224086
Built:             Thu Mar 24 01:48:21 2022
OS/Arch:           linux/amd64
Context:           default
Experimental:      true

Server: Docker Engine - Community
Engine:
  Version:          20.10.14
  API version:      1.41 (minimum version 1.12)
  Go version:       go1.16.15
  Git commit:       87a90dc
  Built:            Thu Mar 24 01:46:14 2022
  OS/Arch:          linux/amd64
  Experimental:     false
containerd:
  Version:          1.5.11
  GitCommit:        3df54a852345ae127d1fa3092b95168e4a88e2f8
runc:
  Version:          1.0.3
  GitCommit:        v1.0.3-0-gf46b6ba
docker-init:
  Version:          0.19.0
  GitCommit:        de40ad0
Code-Sprache: YAML (yaml)
PRTG
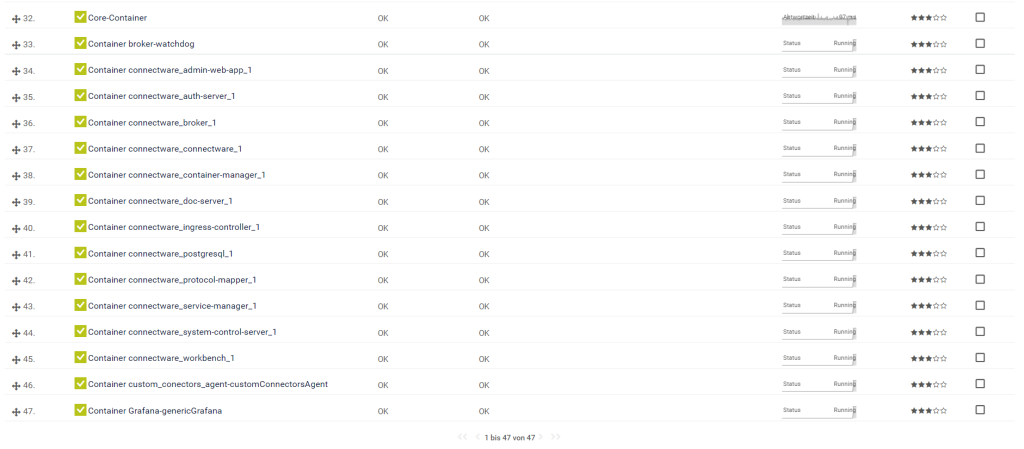
The last and final step is to install the docker sensor inside of PRTG. This should be fairly easy to accomplish by following the provided instructions from https://www.paessler.com/manuals/prtg/docker_container_status_sensor.


Need more help?
Can’t find the answer you’re looking for?
Don’t worry, we’re here to help.


