Connectware & AWS IoT (Greengrass) Integration
Prerequisites
In this lesson, we will send data from the Connectware MQTT Broker to AWS IoT.
It is required to set up a Connectware instance and at least one AWS IoT Device. In case of using AWS IoT at the edge, an AWS IoT Greengrass Core has to be set up.
We assume you are already familiar with Connectware and its service concept. If not, we recommend reading the articles Connectware Technical Overview and Service Basics for a quick introduction. Furthermore, this lesson requires basic understanding of MQTT and how to publish data on an MQTT topic. If you want to refresh your MQTT knowledge, we recommend the lessons MQTT Basics and How to connect an MQTT client to publish and subscribe data.
Introduction
This article is divided into three parts.
First, it provides general information about AWS IoT services and their differences. Feel free to skip this section if you are familiar with AWS IoT and the differences between AWS IoT Core and IoT Greengrass.
Then, the current integration mechanisms between Connectware and the AWS IoT are explained through a hands-on approach.
Finally, the article describes the tools to work with your MQTT use case to prototype, review and monitor the integration scenario.
AWS IoT
AWS IoT is a managed cloud platform that lets connected devices interact easily and securely with cloud applications and other devices. AWS IoT practically supports a nearly unlimited number of devices and messages, and can process and route those messages to AWS endpoints and to other devices reliably and securely.
For AWS IoT, Amazon offers a software development kit available for most popular programming languages and platforms.
AWS IoT Core
AWS IoT Core is the main component to manage devices, their certificates, shadows, Greengrass resources and integration rules to subsequent AWS resources like IoT Analytics. It also offers ways to audit and test your IoT use cases.
AWS IoT Greengrass
AWS IoT Greengrass extends AWS Cloud resources to edge devices, so they can act locally on the generated data, while still using the cloud for management, analytics, and durable storage. It is possible for connected devices to interact with AWS Lambda functions and Docker containers, execute predictions based on machine learning models, keep device data in sync, and communicate with other devices – even when not connected to the Internet.
Greengrass has the following advantages:
- it allows reducing latency in the solution and responding to local events in near real-time.
- it decreases the cost and amount of data devices exchange with the cloud.
- it makes it possible to operate offline even with interrupted connectivity to the cloud.
- it provides secure communication by authenticating devices and encrypting device data for both local and cloud communications so that data is never exchanged without proven identity.
- it simplifies device programming with support for AWS Lambda and Docker containers.
Although in many scenarios these advantages are very significant, one could also mention some drawbacks to make the picture more complete:
- Relying on these advantages also comes with a vendor lock-in to AWS resources.
- The Greengrass initial setup is comparatively heavyweight and complex.
- The advantage of decreased cost must be put into perspective: it is true compared to using AWS IoT without an edge gateway, but Greengrass customers pay per device, the traffic to the cloud and for any other subsequent AWS resources used within Greengrass.
- The learning curve is rather steep for users who have not yet used AWS resources in depth. In those cases it might be easier and more efficient to integrate machines in an IIoT edge solution such as the Connectware with their endpoints, data mapping, transformation rules, and multiple distribution targets (even different cloud providers).
Connectware & AWS IoT Integration
Before proceeding further, first set up AWS IoT Core (and AWS IoT Greengrass for an edge deployment) by following the respective instructions:
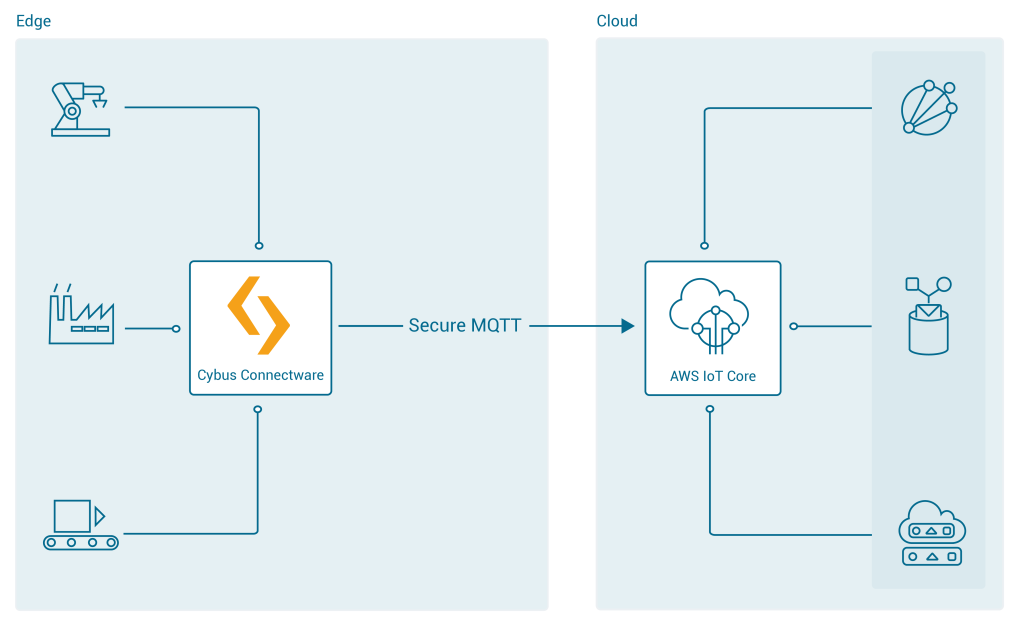
To integrate AWS IoT with Cybus Connectware, the built-in MQTT connector with TLS support is the simplest, most reliable and secure way of communication. For a successful AWS IoT integration, Connectware does not require more than that. As an additional advantage, the Connectware MQTT connector has also data buffering built-in, so that data is stored locally when there is a temporary connection failure with AWS IoT Core or Greengrass Core.
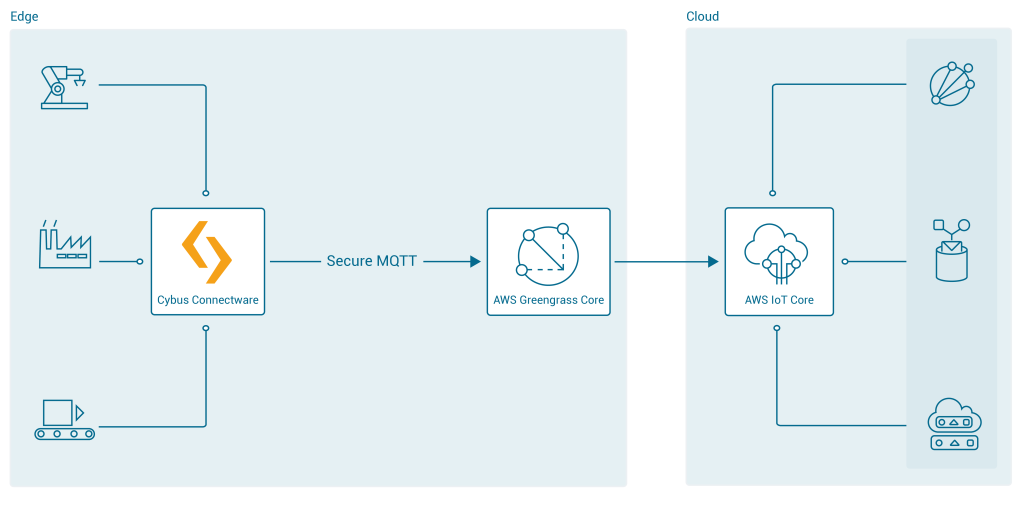
There can be two integration scenarios.
In the first integration scenario, the Connectware connects directly to the AWS cloud:
In the second integration scenario, the Connectware is connected to Greengrass Core, which is meant to be deployed as a gateway to the AWS cloud next to the Connectware IIoT Edge Gateway:
Cybus Connectware Service for AWS IoT
For AWS IoT connections using the Connectware, the following has to be configured:
- the AWS IoT ATS endpoint address for a Cybus MQTT connection resource
- the certificates provided after creation of an AWS IoT Core device
- the Amazon root certificate
For details on how to get this information, see the article How to connect AWS IoT and Greengrass. Use the example below to implement a simple AWS IoT service transmitting any data structure in the selected MQTT topic.
The definitions part requires PEM formatted certificates:
- caCert: the root certificate provided by Amazon (AmazonRootCA1.pem)
- clientCert: the device certificate
- clientPrivateKEy: the device private key
You may then configure Endpoint and Mapping resources following the Cybus resource documentation.
The commissioning file below sends any data published on topics ${Cybus::MqttRoot}/test/#topic to AWS IoT into topics TestDevice/$topic with a simple transformation rule.
Make sure you are publishing data on the Connectware broker on the respective topic. The placeholder ${Cybus::MqttRoot} represents the root topic defined as services/<serviceId> after the service is successfully started. The notation #topic/$topic represents a wildcard mapping from any topic name used in subscribe to the same topic name in publish, which has the effect of an MQTT bridge with applied rules like the transformation in the example.
Further details on MQTT topic transformations can be found in the article How to connect an MQTT client to publish and subscribe data.
description: >
  Cybus Connectware to AWS IoT Core
metadata:
  name: AWS IoT Core Test
  version: 1.0.0
  provider: cybus
  homepage: https://www.cybus.io

parameters:
  Aws_IoT_Endpoint_Address:
    type: string
    description: The ATS endpoint to reach your AWS account's AWS IoT Core
    default: <your-aws-account-endpoint-id>-ats.iot.eu-central-1.amazonaws.com

definitions:

  # The root CA certificate as PEM format (AmazonRootCA1.pem)
  caCert: |
    -----BEGIN CERTIFICATE-----
    -----END CERTIFICATE-----
  # The device certificate in PEM CRT format
  clientCert: |
    -----BEGIN CERTIFICATE-----
    -----END CERTIFICATE-----
  # The device private key in PEM format
  clientPrivateKey: |
    -----BEGIN RSA PRIVATE KEY-----
    -----END RSA PRIVATE KEY-----

resources:

  awsMqttConnection:
    type: Cybus::Connection
    properties:
      protocol: Mqtt
      connection:
        host: !ref Aws_IoT_Endpoint_Address
        port: 8883
        scheme: mqtts
        clientId: !sub "${Cybus::ServiceId}-awsMqttConnection"
        mutualAuthentication: true
        caCert: !ref caCert
        clientCert: !ref clientCert
        clientPrivateKey: !ref clientPrivateKey

  sourceTargetMapping:
    type: Cybus::Mapping
    properties:
      mappings:
        - subscribe:
            topic: !sub "${Cybus::MqttRoot}/test/#topic"
          publish:
            connection: !ref awsMqttConnection
            topic: TestDevice/$topic
          rules:
            - transform:
                expression: |
                  (
                    {
                      "deviceId": "TestDevice",
                      "payload": $
                    }
                  )
Code language: YAML (yaml)
Changes for AWS IoT Greengrass
In order to connect to a Greengrass Core, the example service commissioning file needs several changes:
- Use the hostname/ip of the Greengrass Core instead of the ATS endpoint
- Use the Greengrass Group Certificate Authority instead of the Amazon Root CA
- Configure the MQTT clientId, which needs to be equal to the device name for which the certificates are configured.
See the article How to connect AWS IoT and Greengrass about how to get the Greengrass Group Certificate Authority.
parameters:
...
  awsGreengrassClientId:
    type: string
    default: TestDeviceEdge
...
resources:
  greengrassTestDeviceEdgeMqttConnection:
    type: Cybus::Connection
    properties:
      protocol: Mqtt
      connection:
        host: !ref Greengrass_Core_Endpoint_Address
        port: 8883
        scheme: mqtts
        clientId: !ref awsGreengrassClientId
        mutualAuthentication: true
        caCert: !ref caCert
        clientCert: !ref clientCert
        clientPrivateKey: !ref clientPrivateKey
...
Code language: YAML (yaml)
Tools
To implement or maintain a new IIoT Edge integration use case as fast and reliable as possible, there are suitable tools for working with MQTT, Connectware and AWS IoT.
AWS Command Line Interface (CLI)
The AWS CLI generally helps with any task on AWS. In this case we have at least two tasks being most efficiently completed using the CLI:
1) Find out the AWS IoT ATS endpoint defined for your AWS account:
aws iot describe-endpoint --endpoint-type iot:Data-ATS
Code language: YAML (yaml)
The response contains the AWS account specific ATS (Amazon Trust Services) endpoint address to be used as the MQTT hostname:
{
   "endpointAddress": "a7t9...1pi-ats.iot.eu-central-1.amazonaws.com"
}
Code language: YAML (yaml)
2) Get the Greengrass Group Certificate Authority certificate in case of using AWS IoT Greengrass. You then need the following for the caCert setting in the service commissioning file instead of the Amazon Root CA:
aws greengrass list-groups
aws greengrass list-group-certificate-authorities --group-id "4824ea5c-f042-42be-addc-fcbde34587e7"
aws greengrass get-group-certificate-authority --group-id "4824ea5c-f042-42be-addc-fcbde34587e7"
--certificate-authority-id "3e60c373ee3ab10b039ea4a99eaf667746849e3fd87940cb3afd3e1c8de054af"
Code language: YAML (yaml)
The JSON Output of the latter call has a field PemEncodedCertificate containing the requested information which needs to be set as the caCert parameter similar to this:
-----BEGIN CERTIFICATE-----
MIIC1TCCAb2gAwIBAgIJANXVxedsqvdKMA0GCSqGSIb3DQEBBQUAMBoxGDAWBgNVBAMTD3d3dy5leGFtcGxlLmNvbTAeFw0yMDEwMDUwNTM4MzRaFw0zMDEwMDMwNTM4MzRaMBoxGDAWBgNVBAMTD3d3dy5leGFtcGxlLmNvbTCCASIwDQYJKoZIhvcNAQEBBQADggEPADCCAQoCggEBAM/0NrS45cm0ovF3+8q8TUzj+E3UH8ldnJJPCQFGMaL+7PoxbO0fYf3ETkEW+dijIZOfus9dSPX7qBDbfilz/HtNppGDem4IjgC52iQl3B1R7TvU8yLNliv43uDDUd+PkzW1cWbUuykr5QPG2sIDSANukosvRdFKO4ydP0Hr9iUdOfbg4k6hMFCrzJubKQqhcBTSsxGtl78abx0Q49shuWr9RRjzqE6mRFa4h0DrKBstgAfmsDRGm4ySBCM7lwxphSsoejb6l39WI/MNU7/U7cGj26ghWHAWp8VCksBOqma8tmr/0BuqcCgKJYaDr1tf4SVxlwU20K+jz0pphdEwSj0CAwEAAaMeMBwwGgYDVR0RBBMwEYIPd3d3LmV4YW1wbGUuY29tMA0GCSqGSIb3DQEBBQUAA4IBAQBkcKC3cgHJGna6OxA5QM3dGM5pEiSXyZt5HWoW8z6wUlYtir6U+mWIb9yg7zaSy9nUOqU4sizQh1HG/Mq9K2WbflGafvfN0wW16uyINdjcfGYDh43UDkXHr5Xzky5XIgt0Fx4BWmjgbLYsza7qpbeIg5ekUYPYQw1Ic2sNpyncmS0eutg4tAO7uzDu1x84WPcZzUjDHKYfupuDXkWroPnHTAxlJ6vtgW976c3Z5rQ5l8bUysWhLBEM8q2OP/zmGDo7fpUHYOKo5qU4h7vGD3t0Pb4ufPOd7XtHuY6HsI2cAPV3tpuetHH6wyAQTG9luhdYrZjAp+ZvlwBm+9nXYp/Y
-----END CERTIFICATE-----
Code language: YAML (yaml)
Cybus Workbench Service
The Workbench service is basically a Node-RED application running securely on the Connectware as a service. This opens up the possibility to install any Node-RED nodes within the service container for quick prototyping as well as for the production environment. If your use-case cannot be achieved with the above service commissioning file, using the workbench will give you some flexibility and additional tools to prototype your solution using Node-RED modules.
In case of AWS IoT, MQTT connection is enough for most integration scenarios. You may use simple injection nodes and some random value generator in order to implement and test the use northbound to AWS IoT:
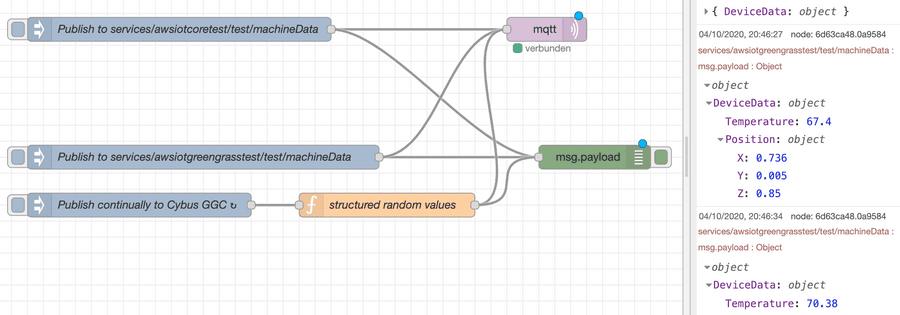
If there are other requirements such as working with shadow devices and other AWS resources, e.g. as part of the IoT Greengrass Core deployment, you may want to use additional Node-RED modules supporting AWS.
AWS IoT SDK
If it comes to more complex data management and handling, you may want to use the AWS IoT Device SDK to create a specific Connector Service for Connectware to cover your requirements.
In most cases, it is enough to process any kind of device data and apply rules to them on the Connectware as the most powerful edge gateway tool. Similar capabilities can be used on the near-cloud gateway AWS IoT Greengrass or AWS IoT Core itself to manage rules and transformations near the shadow devices definitions.
What works best depends on your business strategy and technical constraints.
AWS IoT Core, Analytics and other AWS Resources
Now that we are successfully sending the data to the IoT Core, we can monitor the transmitted data using various AWS resources.
The obvious tool is the AWS IoT Core MQTT Client offered on the AWS IoT console. With this tool you regularly subscribe to your topic defined in the service commissioning file for outgoing data:
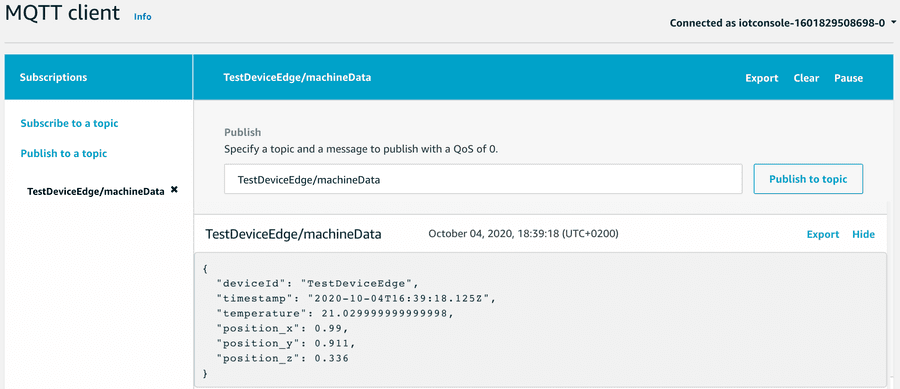
In order to make use of AWS resources, you define AWS IoT rules and define actions appropriately, e.g. transmission to IoT Analytics and a DynamoDB table:
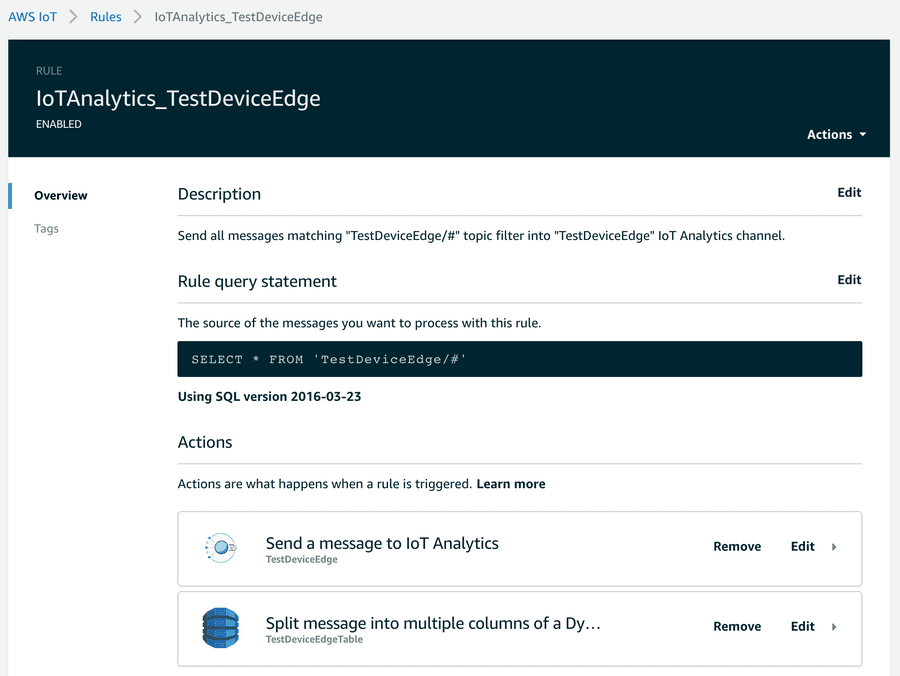
The AWS IoT Console helps to quickly implement data transfer to these endpoints.
An example of how to work with these resources could be a change to the transformation mentioned above to better meet the requirements using the fast and easy mapping support of the Connectware. Given a requirement to flatten an original data object injected into the internal topic, you can easily transform that data using a Connectware transformation rule using Jsonata:
Given a structured object:
"DeviceData": {
    "Temperature": <decimal>,
    "Position": {
        "X": <decimal>,
        "Y": <decimal>,
        "Z": <decimal>
    }
}
Code language: YAML (yaml)
As an example, the above mentioned mapping could be then enhanced for flattening the elements and adding a timestamp:
  sourceTargetMapping:
...
          rules:
            - transform:
                expression: |
                  (
                    {
                      "deviceId": "TestDeviceEdge",
                      "payload": $
                    }
                  )
            - transform:
                expression: |
                  (
                    {
                      "deviceId": "TestDeviceEdge",
                      "timestamp": $now(),
                      "temperature": $.payload.DeviceData.Temperature,
                      "position_x": $.payload.DeviceData.Position.X,
                      "position_y": $.payload.DeviceData.Position.Y,
                      "position_z": $.payload.DeviceData.Position.Z
                    }
                  )
Code language: YAML (yaml)
After implementing the use case, you may see the options to shorten things a bit. Connectware then plays its strength with fast integration processes near the connected devices, where most of the data pre-processing can be realized with low latency and fewer costs before transmitting it to the cloud.
The enhanced transformation rule within Connectware mentioned above may be inspired by a requirement to write the data in a well-structured database:
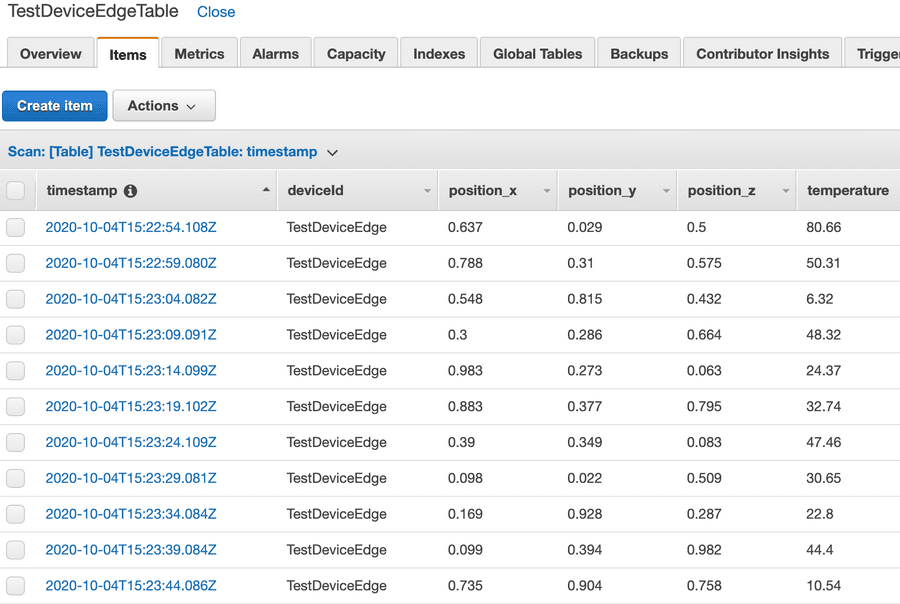
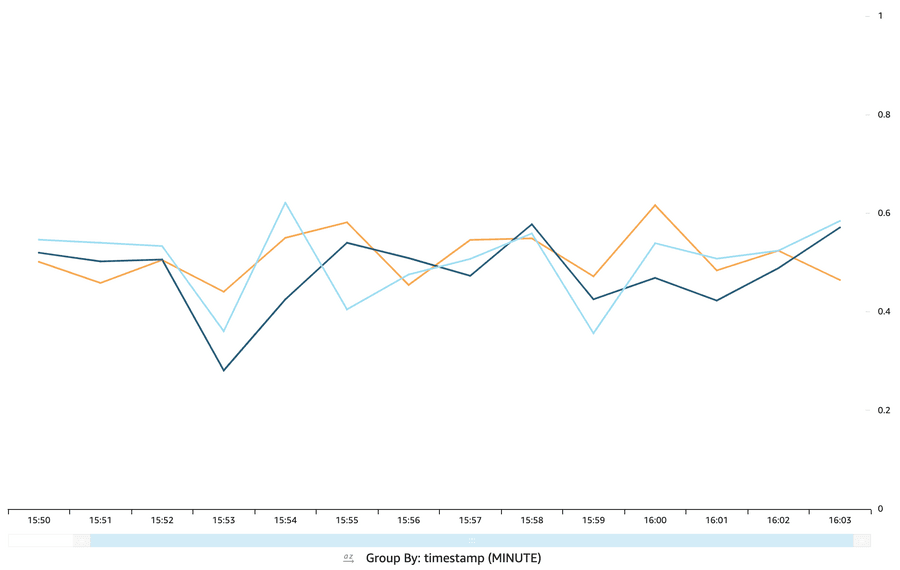
Or the requirement was to create some graph with Amazon Quicksight:
If it comes to the AWS Cloud, there is a vast amount of resources that can be useful to create your IoT Application. You should especially have a look at lambda functions that could be deployed to your IoT Greengrass Core instance.
Other new tools like AWS IoT SiteWise or AWS IoT Things Graph may be useful to build your IoT applications faster with easier management and monitoring.
Summary
This lesson first offered a brief introduction to AWS IoT and its components available for integration with other services. Then it explained how to send data from the Connectware MQTT Broker to AWS IoT Core or Greengrass Core with a simple commissioning file using the built-in MQTT connector of Connectware. Furthermore, the Cybus workbench service for prototyping more advanced scenarios was presented. The lesson finished with a description of some basic and advanced tools used to monitor data flow between AWS IoT and Connectware.
Need more help?
Can’t find the answer you’re looking for?
Don’t worry, we’re here to help.
